SpreaView Documentation
Introduction to SpreaView
SpreaView is a software platform designed to support conference organizers in gathering structured, high-quality feedback on presentations and speakers. With SpreaView, organizers can easily set up speaker evaluations for every session in their event schedule, enabling attendees to provide immediate and meaningful reviews via mobile-friendly forms.
Why SpreaView?
Conference feedback is an essential tool for continuous improvement, and SpreaView makes this process both simple and effective. By collecting feedback in a standardized way, SpreaView helps:
- Organizers identify the most popular topics and speakers, fine-tune future programs, and maintain high event quality.
- Speakers receive actionable feedback on their content, delivery, and interaction, helping them improve their presentations and better connect with audiences.
Key Features
- QR Code-Based Evaluation Access: Each session is paired with a unique QR code, allowing attendees to quickly open the evaluation form on their device.
- Structured Review Form: Attendees rate sessions on four criteria—speaker performance, content quality, delivery, and audience interaction—on a 1–5 star scale.
- Optional Comments Field: Organizers can choose to enable a free-text field for qualitative feedback.
- Real-Time Dashboards: Both organizers and speakers can access dashboards with up-to-date review data and aggregated scores.
Getting Started
Explore our documentation to learn how to:
- Set Up and Manage Sessions: Instructions on creating and configuring sessions for review.
- Access and Submit Reviews: Guide for attendees to leave feedback and for organizers to review submitted data.
- Utilize Feedback Insights: Tips on interpreting review data and applying it to improve future events.
We’re excited to have you on board and look forward to helping you make your events even more impactful with SpreaView. For any questions or support, please refer to our help section or contact our support team.
Thank you for choosing SpreaView!
Explore the sections below to get started with setting up your sessions, collecting feedback, and making the most out of SpreaView’s powerful features.
1 - Getting Started
All you need to know to get started with SpreaView
Getting Started with SpreaView
Welcome to SpreaView, your platform for organizing, collecting, and analyzing speaker evaluations at conferences. This guide will help you get up and running quickly.
Step 1: Register an Account
To use SpreaView, you need to create a user account. Registration ensures that your data is secure and that you can manage your conferences and evaluations over time.
- Visit SpreaView registration page and complete the sign-up process.
- After registering, you can log in and begin setting up your environment.
Note: All features in SpreaView are available only to registered users.
Step 2: Create an Organization
Before you can set up a conference, you must first create an organization. An organization represents the overarching entity (e.g., your company, user group, or event team) under which conferences are managed.
Why Organizations?
- Organizations serve as a container for one or more conferences.
- Multiple users can be added to an organization, enabling team collaboration on conference setup and review analysis.
- User permissions and access are scoped at the organization level.
How to Create an Organization
- After logging in, navigate to the Organizations section.
- Click Create New Organization.
- Provide a name and optional description for your organization.
- Save your changes.
Once your organization is created, you’re ready to start adding conferences.
Step 3: Create a Conference
With your organization in place, you can now create your first conference. Each conference is where speaker evaluations will be configured and collected.
Steps:
- Open the Conferences section within your organization dashboard.
- Click Create Conference.
- Fill in the conference name, dates, and other relevant details.
- Save the conference and begin adding sessions for evaluation setup.
You’re now ready to start configuring speaker evaluations and collecting valuable feedback from attendees.
Need more help? Check out the next section: Setting Up Sessions and Evaluations
1.1 - Registration
Create an account and log in to SpreaView
Welcome to SpreaView! Follow this guide to set up your account and start utilizing SpreaView’s powerful features for evaluating and improving conference presentations.
Step 1: Creating a Free Account
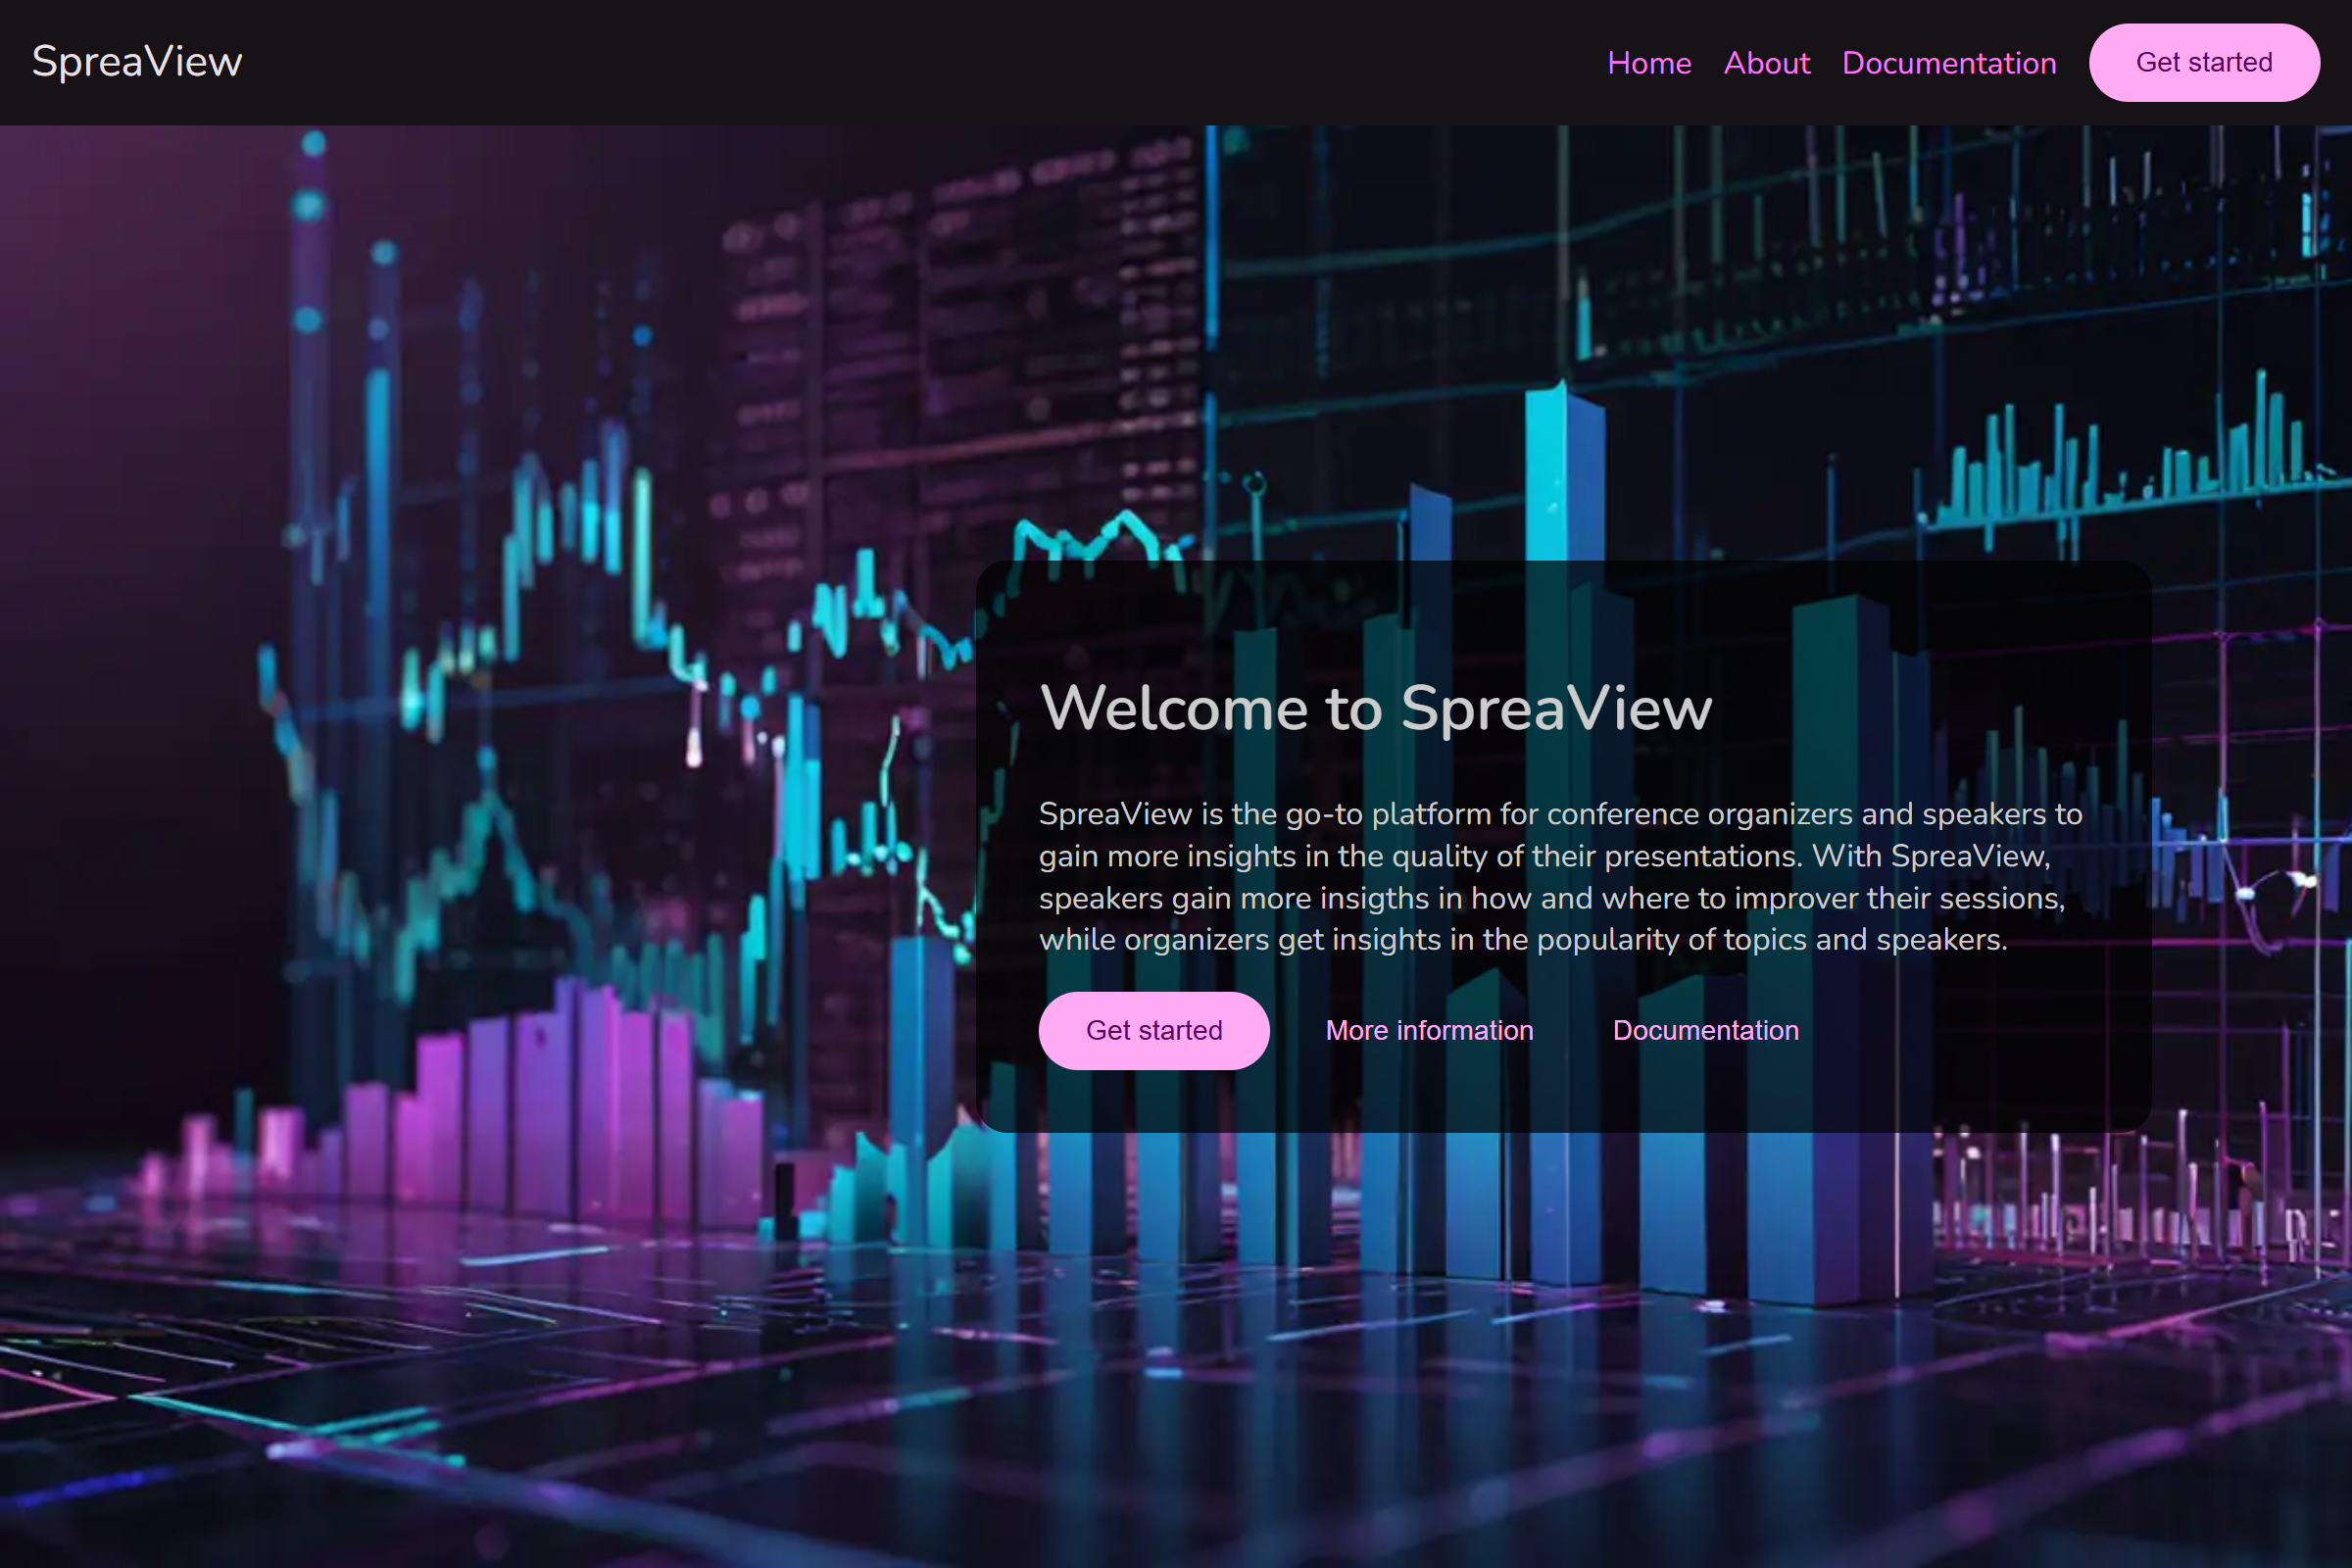
- Visit the Welcome Page
- Navigate to the SpreaView homepage.
- Click the Get Started button to begin the registration process.
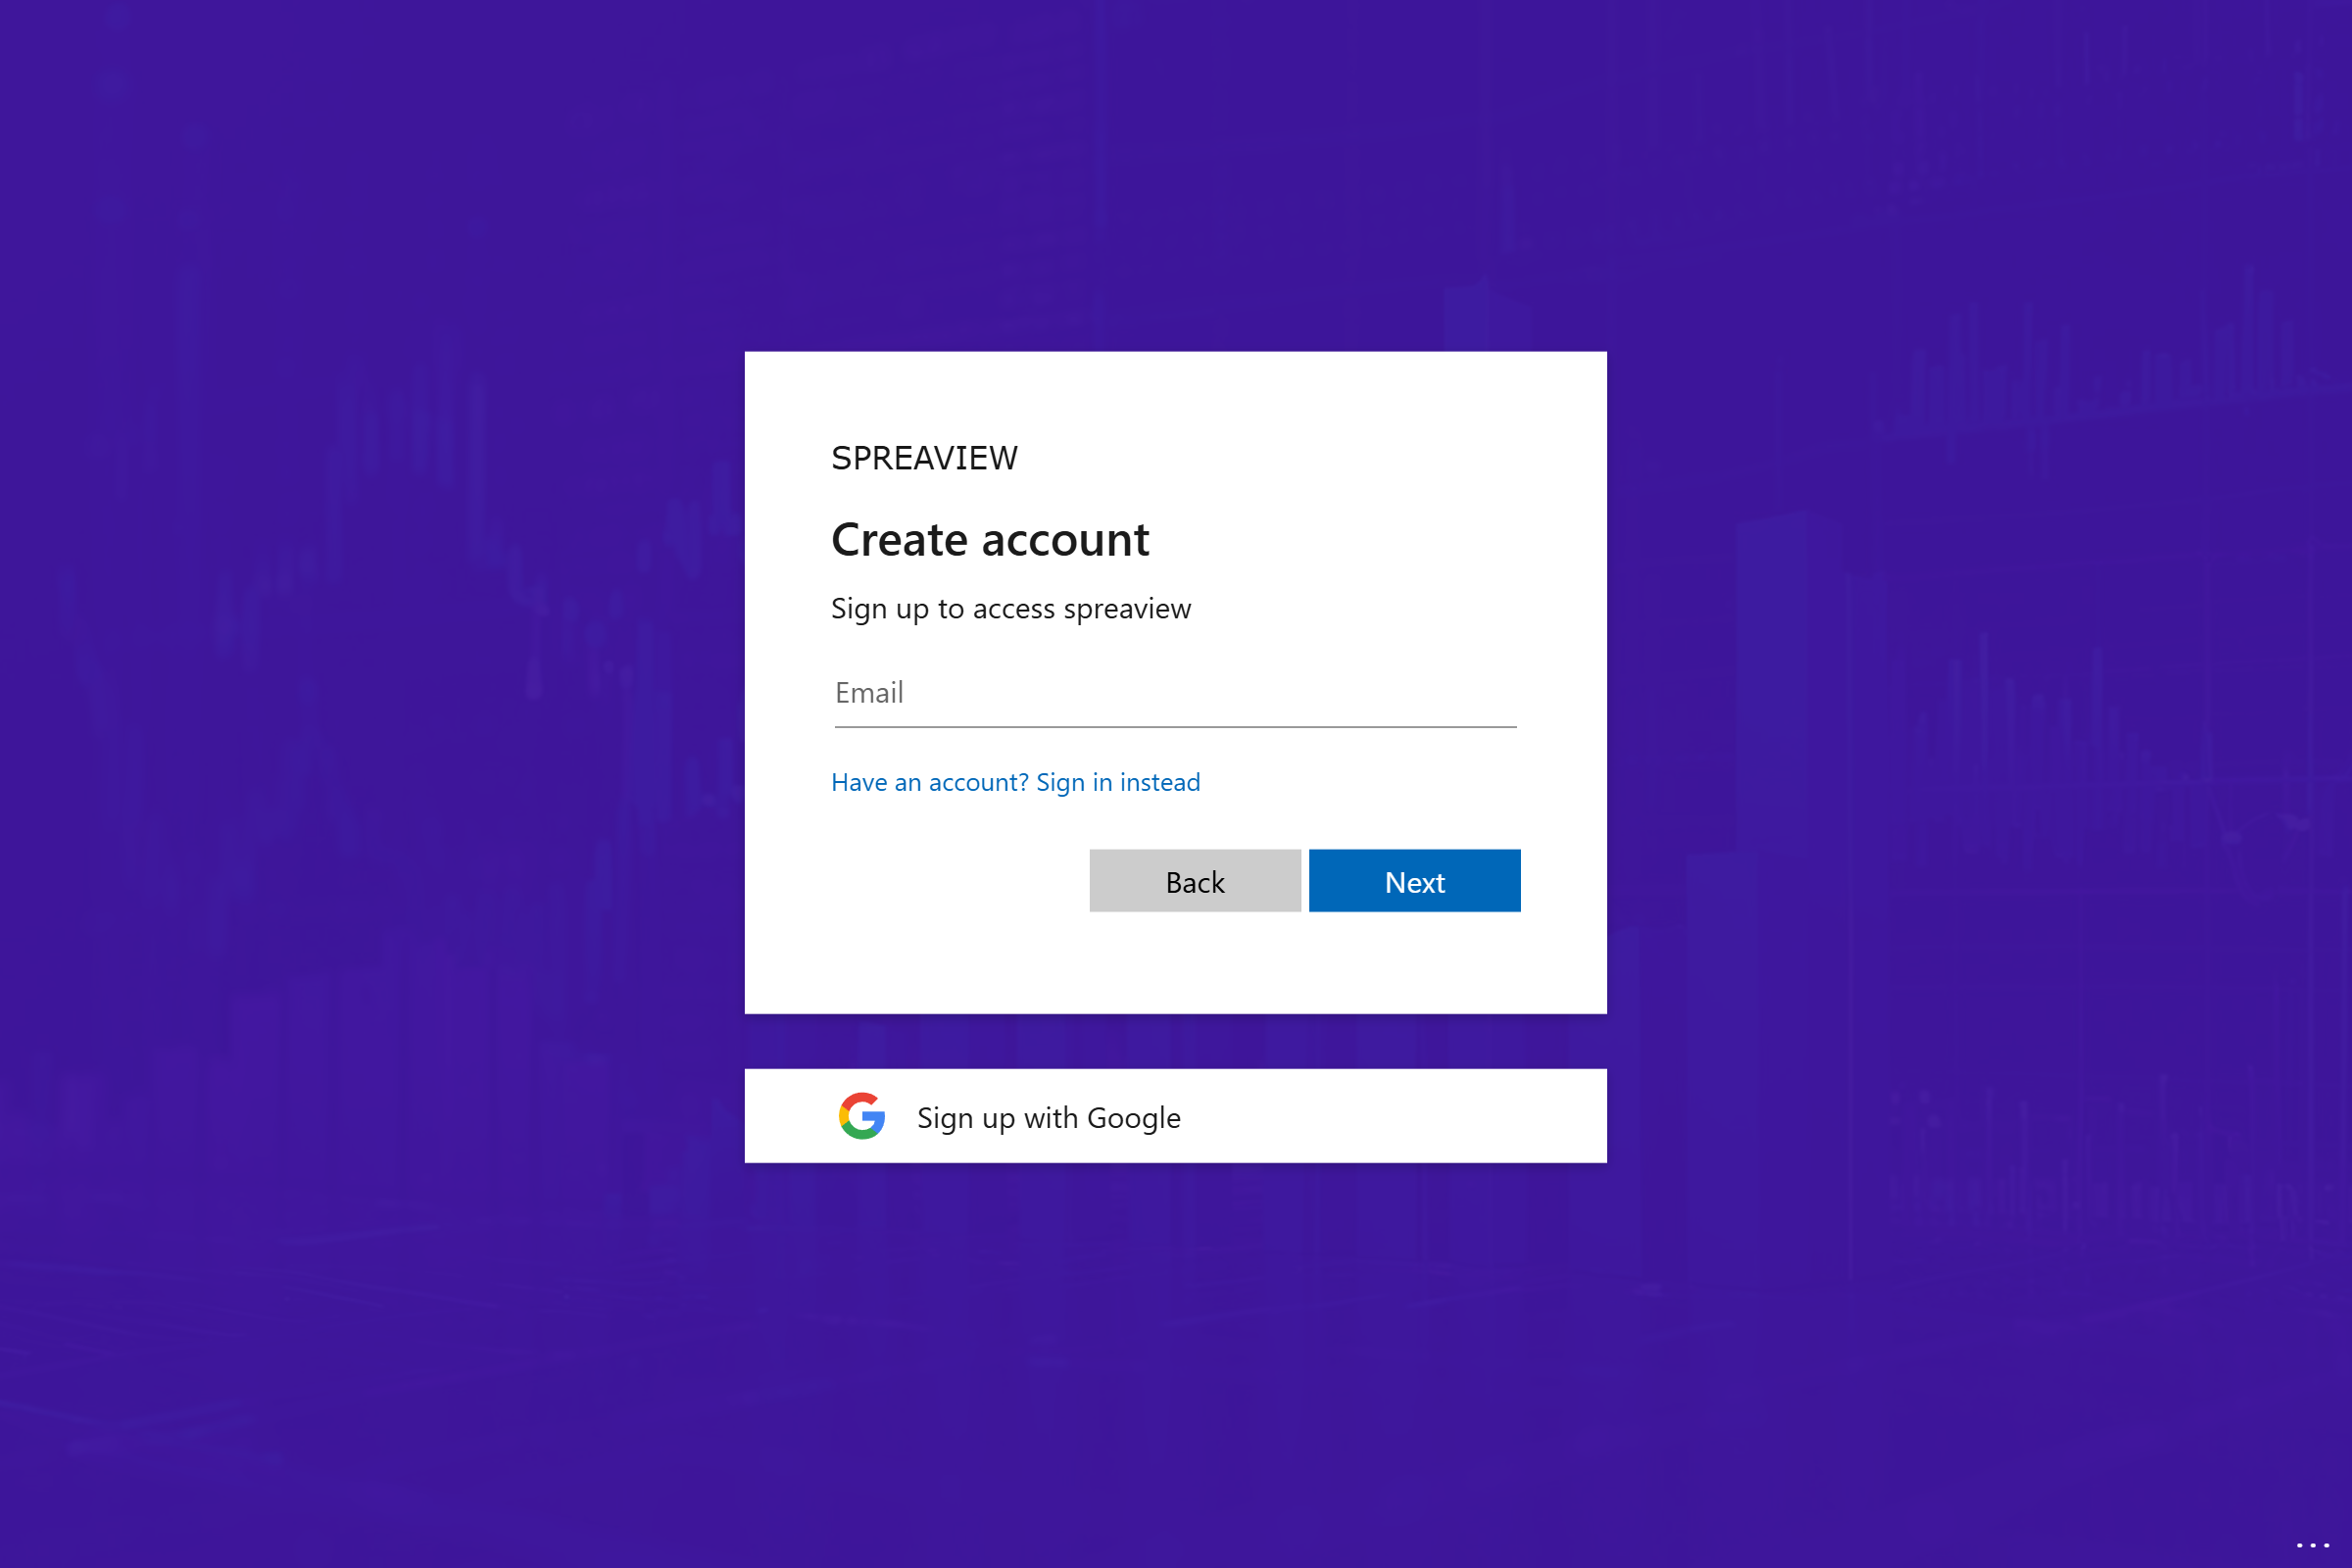
Access the Log-In Page
- You will be redirected to the log-in page.
- Click on the link for No Account? Create one to create a new account.
Email Confirmation
- Enter your email address and follow the confirmation steps sent to your inbox.
- After confirming your email, set a secure password to complete this part of the registration.
Step 2: Creating Your SpreaView Account
Log In to SpreaView
- Return to the SpreaView log-in page and sign in with your newly created credentials.
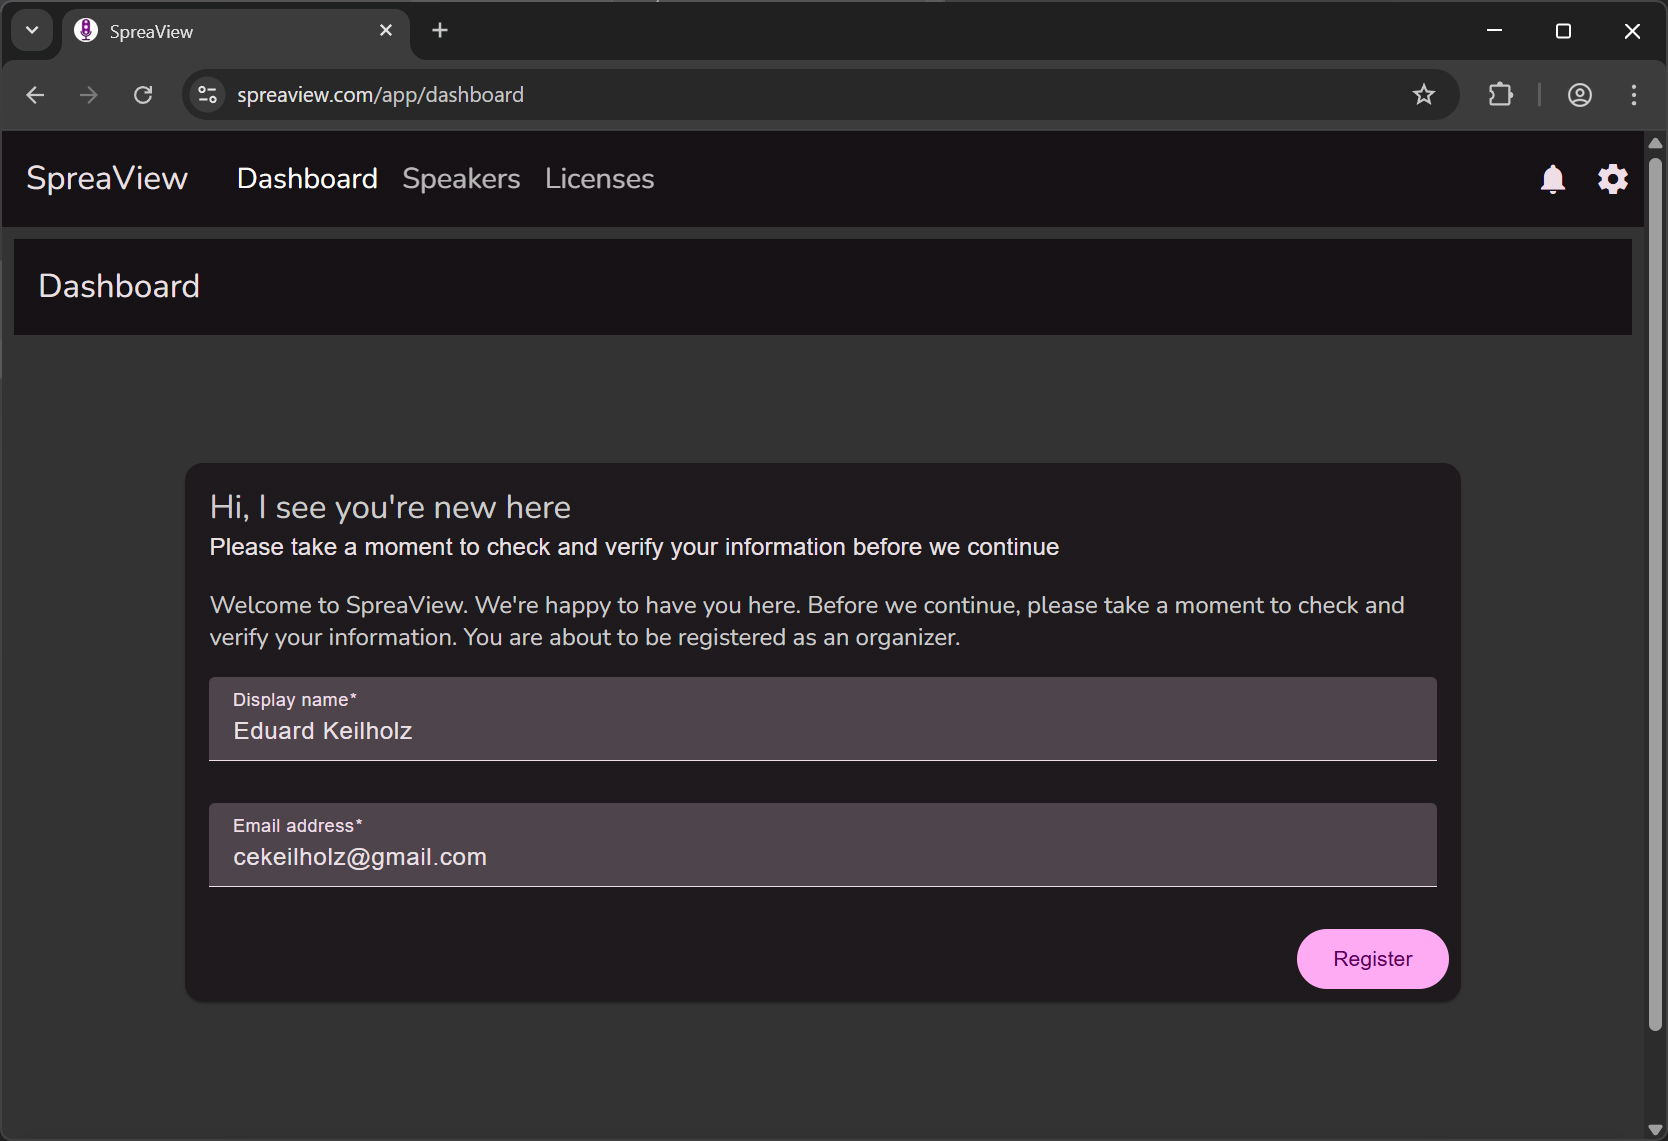
Provide Your Details
- Upon first login, you will be prompted to create your SpreaView account.
- Your name will be pre-filled based on your registration information, but you can update it if necessary.
- Enter an email address for communication purposes.
Complete Registration
- Review your details and submit to complete your SpreaView account setup.
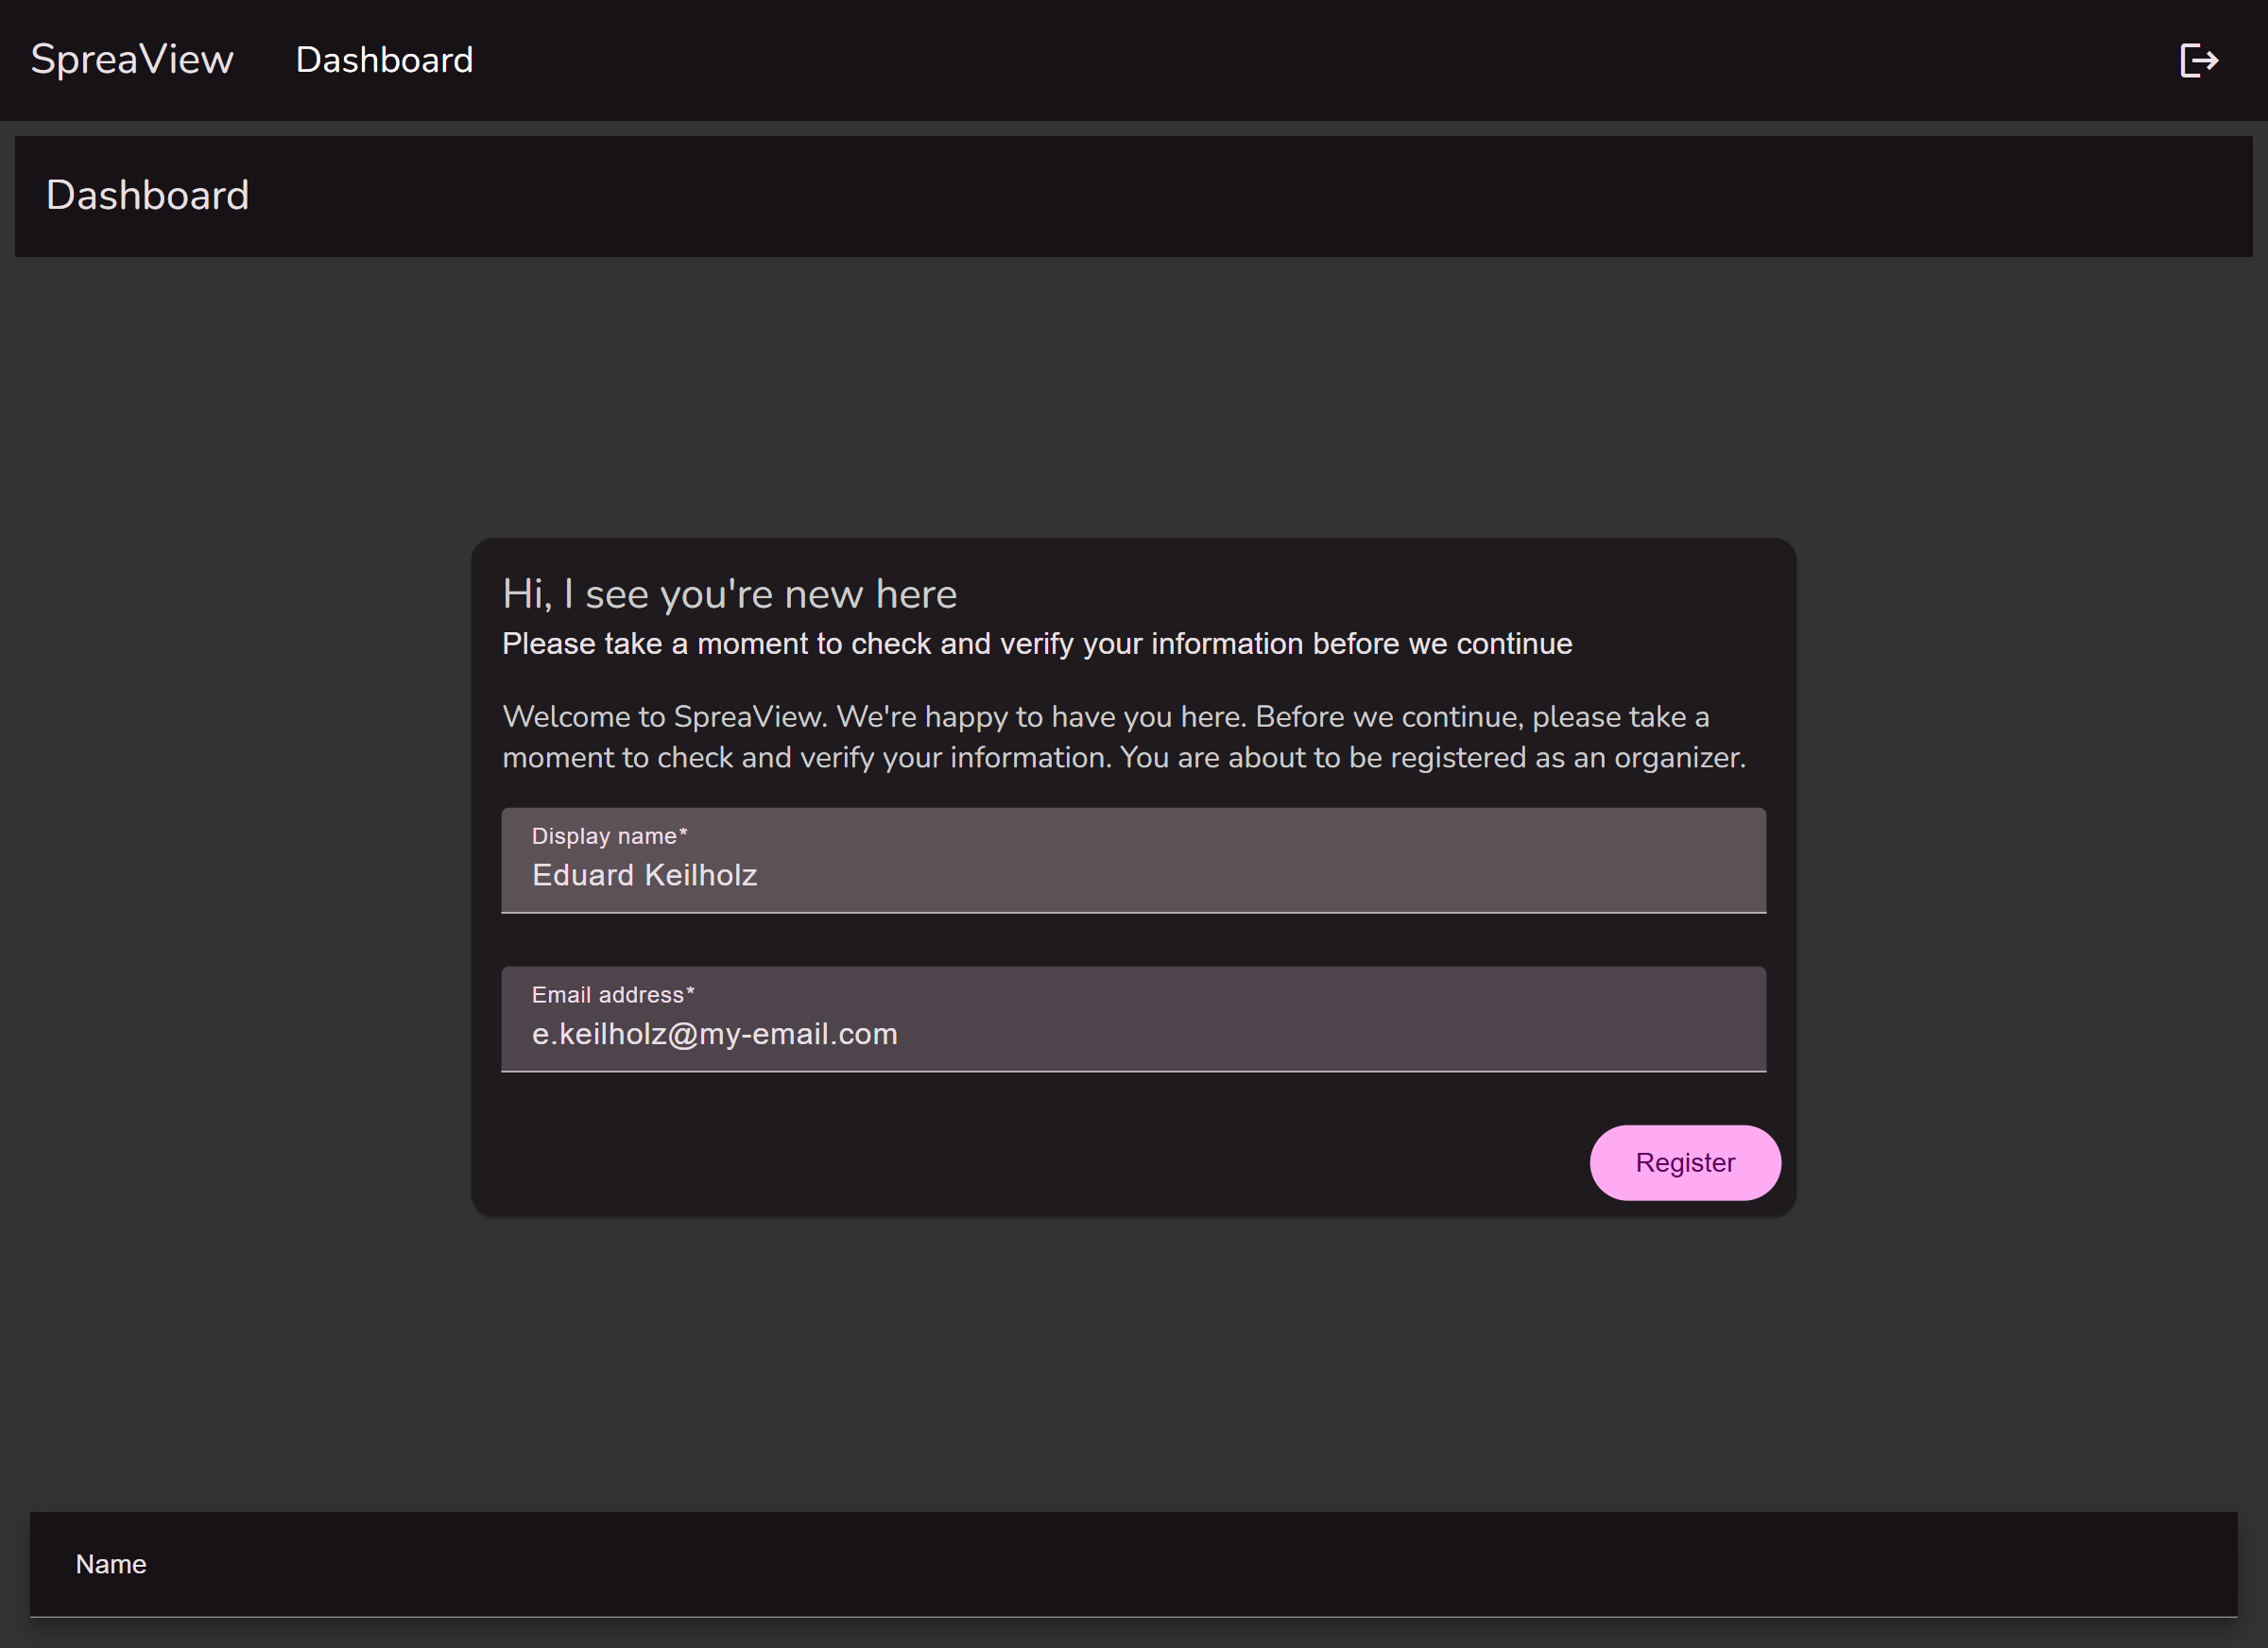
Step 3: Accessing the Dashboard
Navigate to Your Dashboard
- After completing the account setup, you will be redirected to the SpreaView dashboard.
- The dashboard serves as your hub for managing events, reviews, and reports.
Create or Join an Organization
- On the dashboard, you can either create a new organization or join an existing one.
- Follow the on-screen instructions to complete this step.
Congratulations! You are now ready to use SpreaView to set up speaker evaluations, analyze presentation data, and provide valuable feedback to your speakers.
1.2 - Organizations
Join an organization to get started
Once you are registred as an Organizer, you need an Organization to work with. If you received an invitation, you can use the invitation code to join an existing Organization. Alternatively, you can create your own organization.
To create an organization, navigate to the ‘Organizations’ tab in the main menu. Click on the ‘Create an Organization’ button to create a new Organization.
Note that this button may appear as a ‘+’ on screens with a smaller resolution.
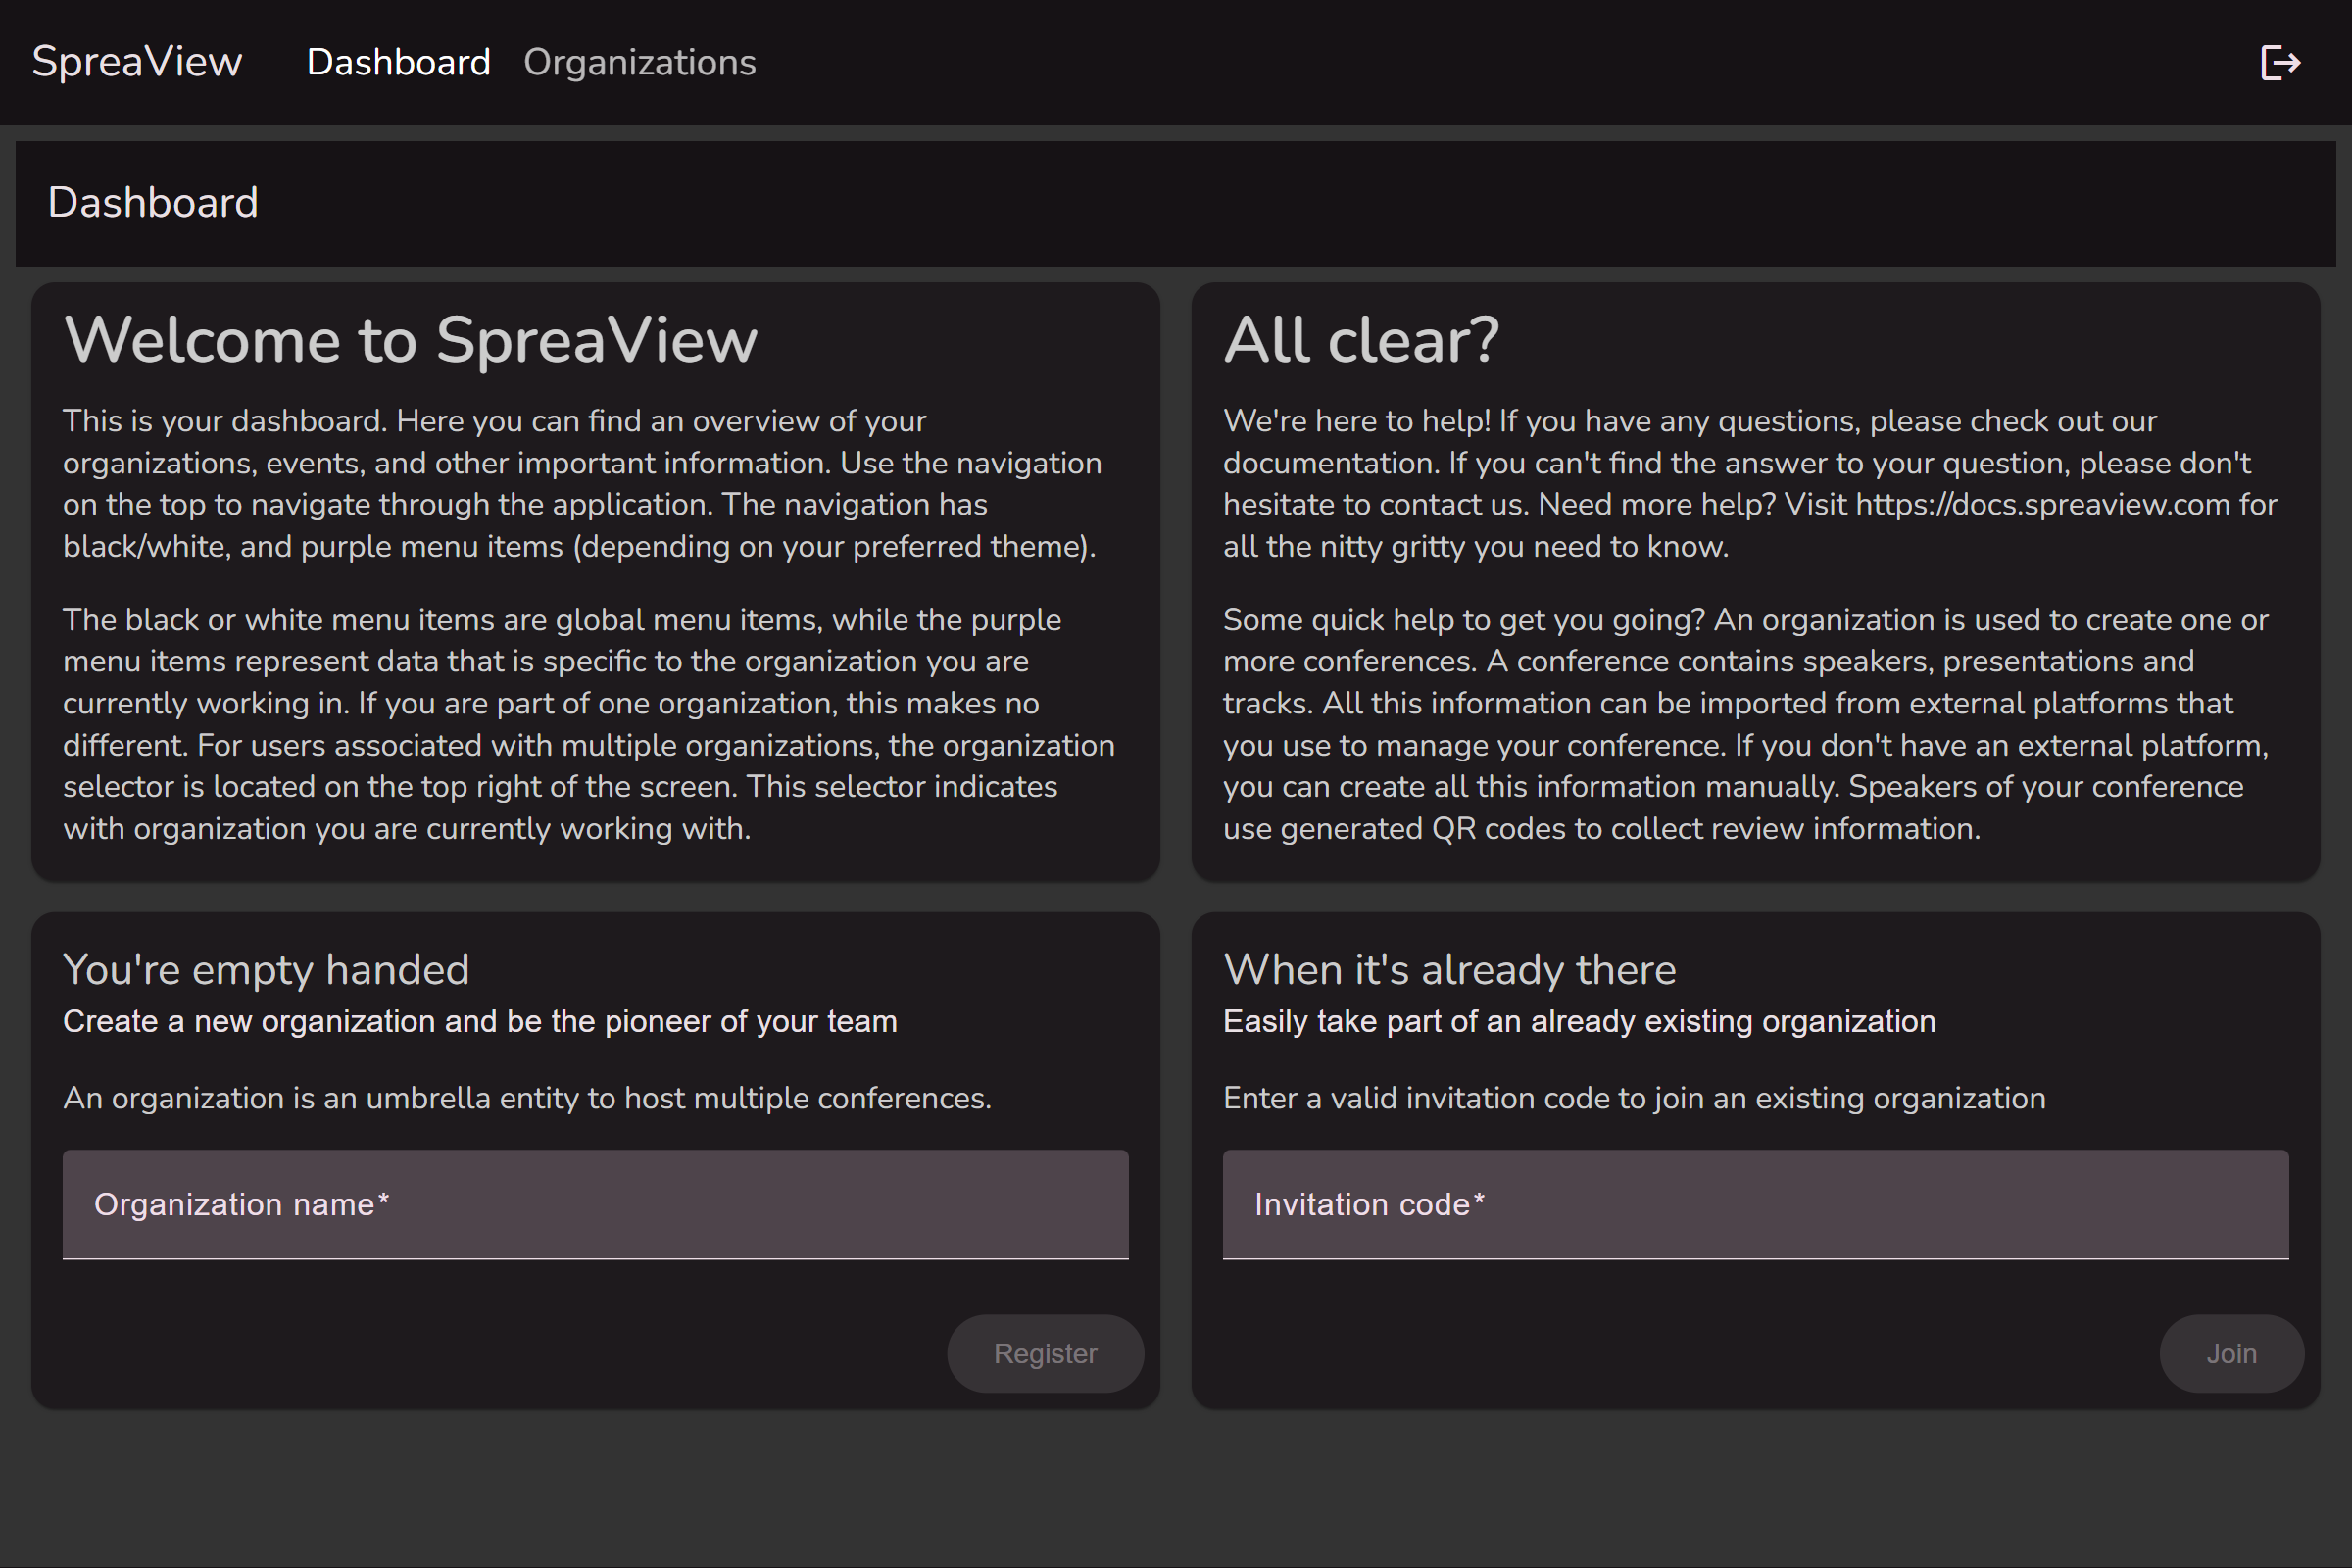
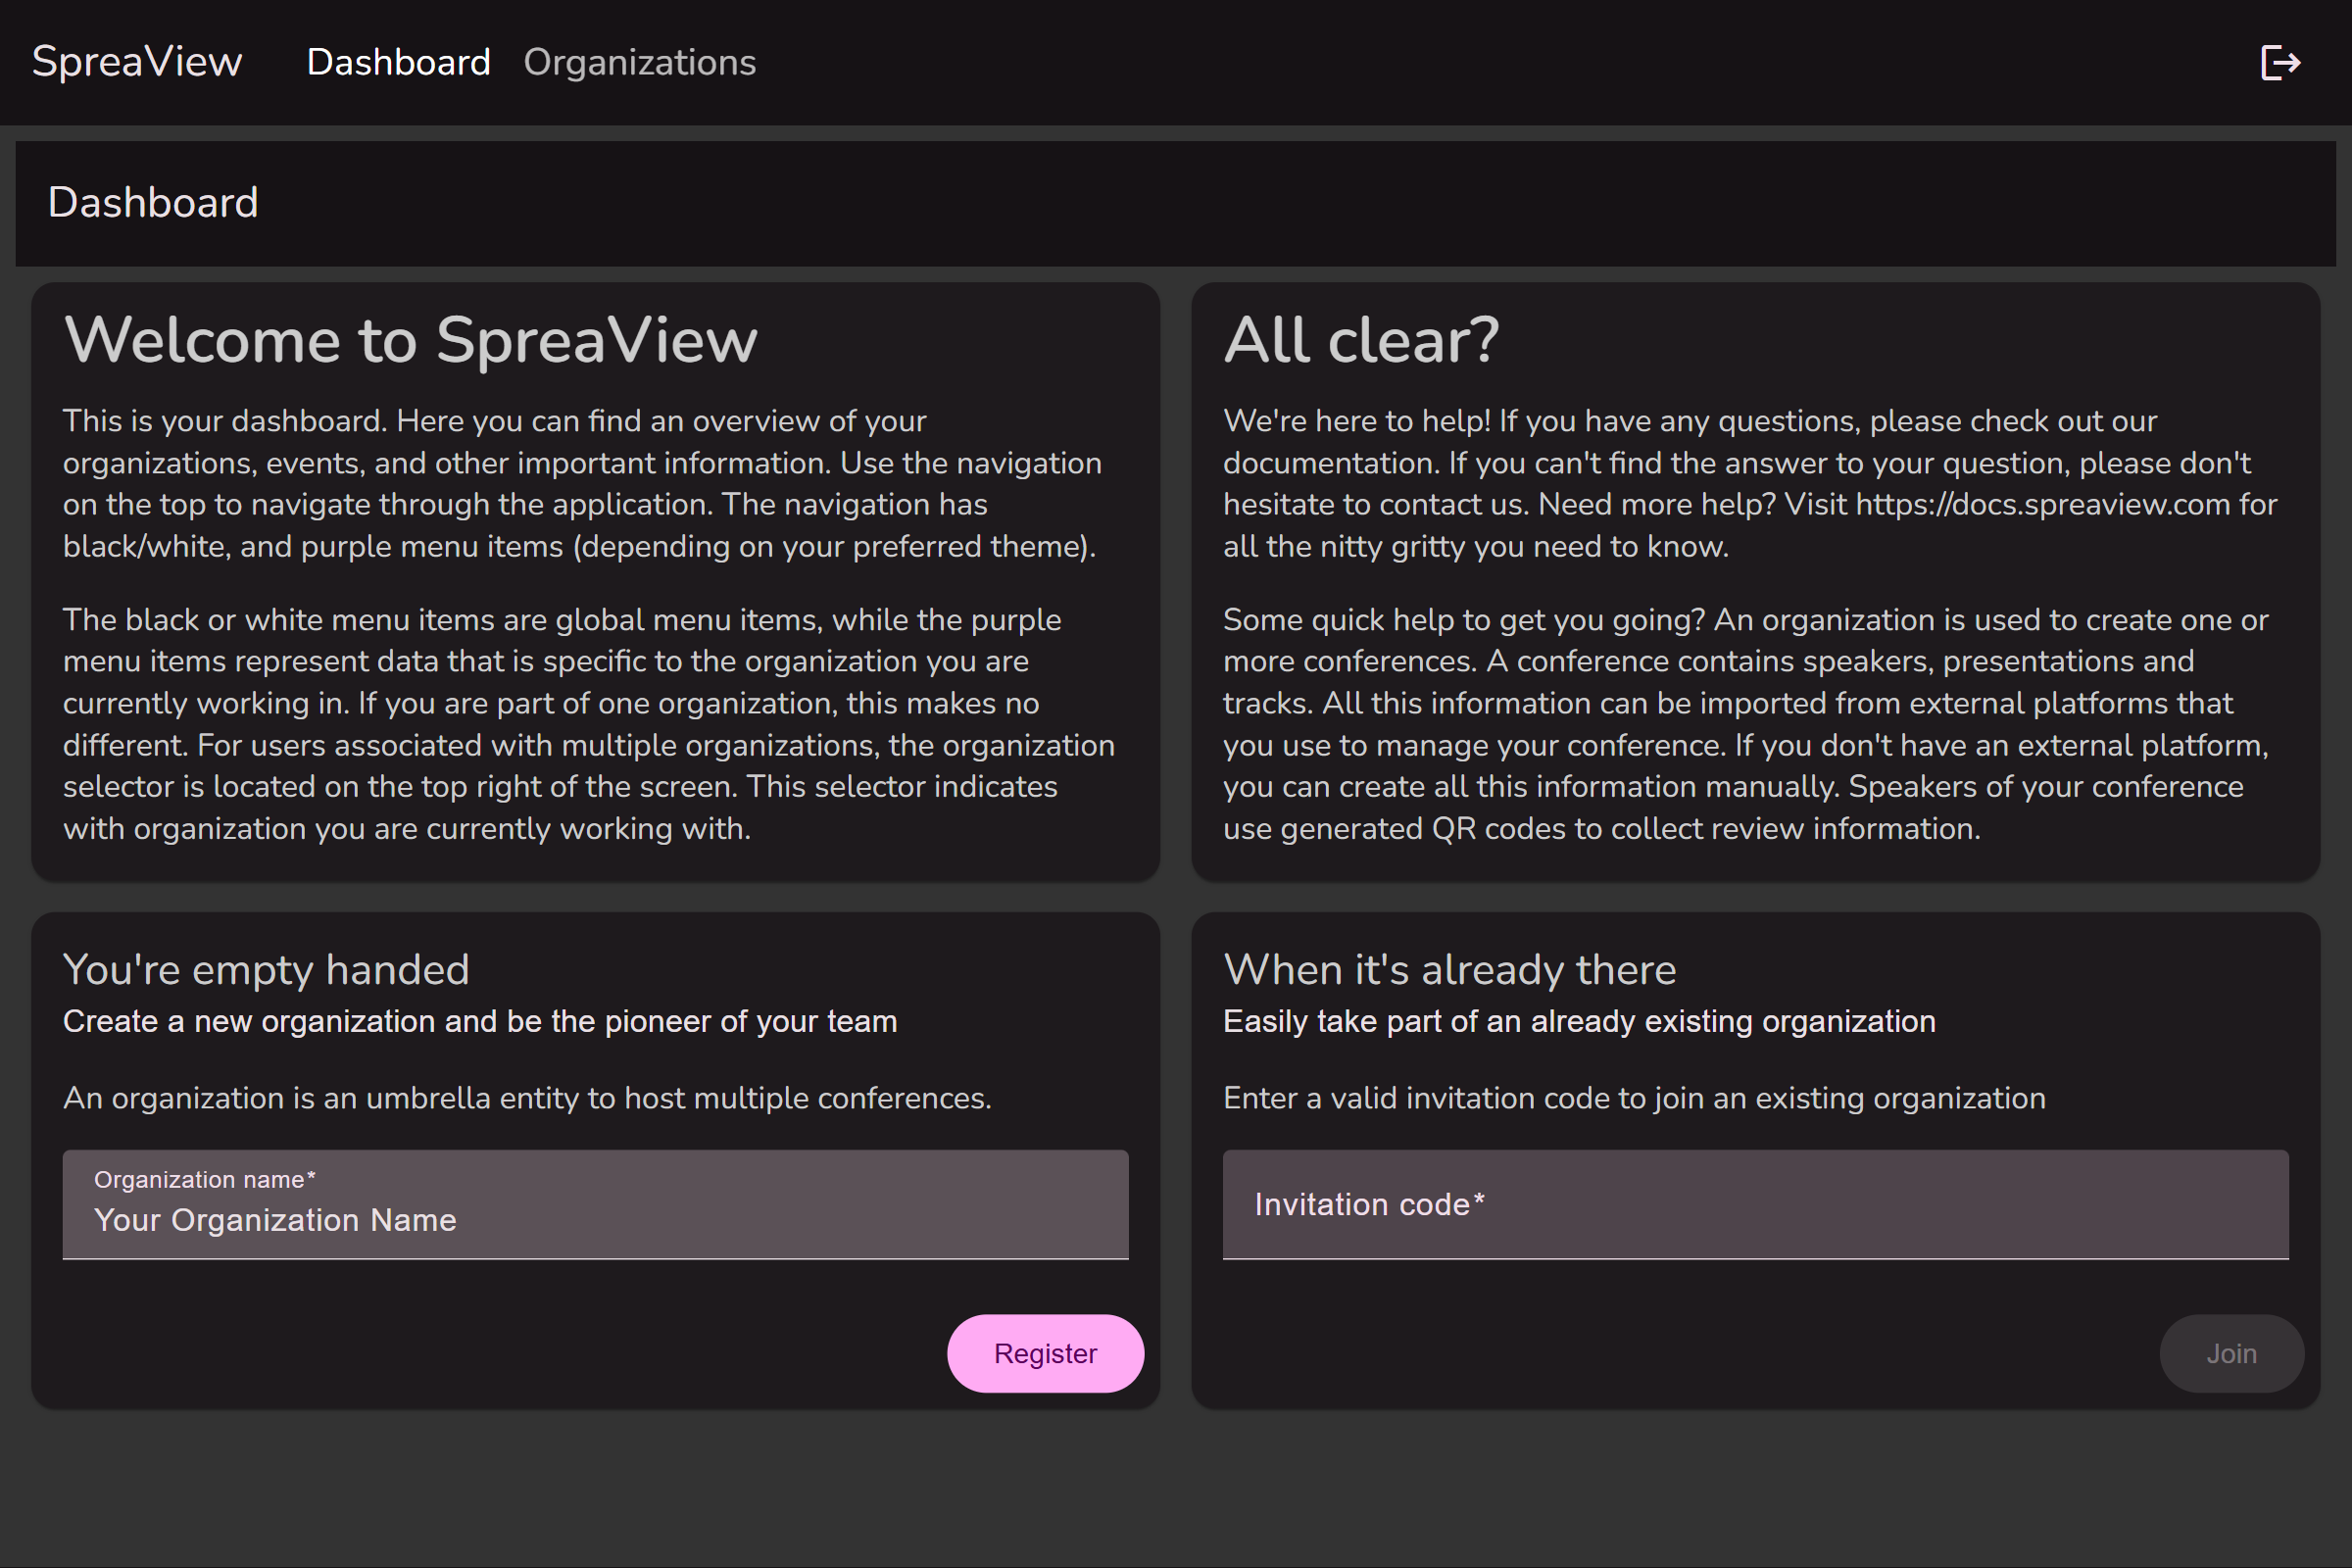
When you are not a member of an organization, you can create a new organization directly from the dashboard
Once saved, the new organization will appear in the list of organizations.
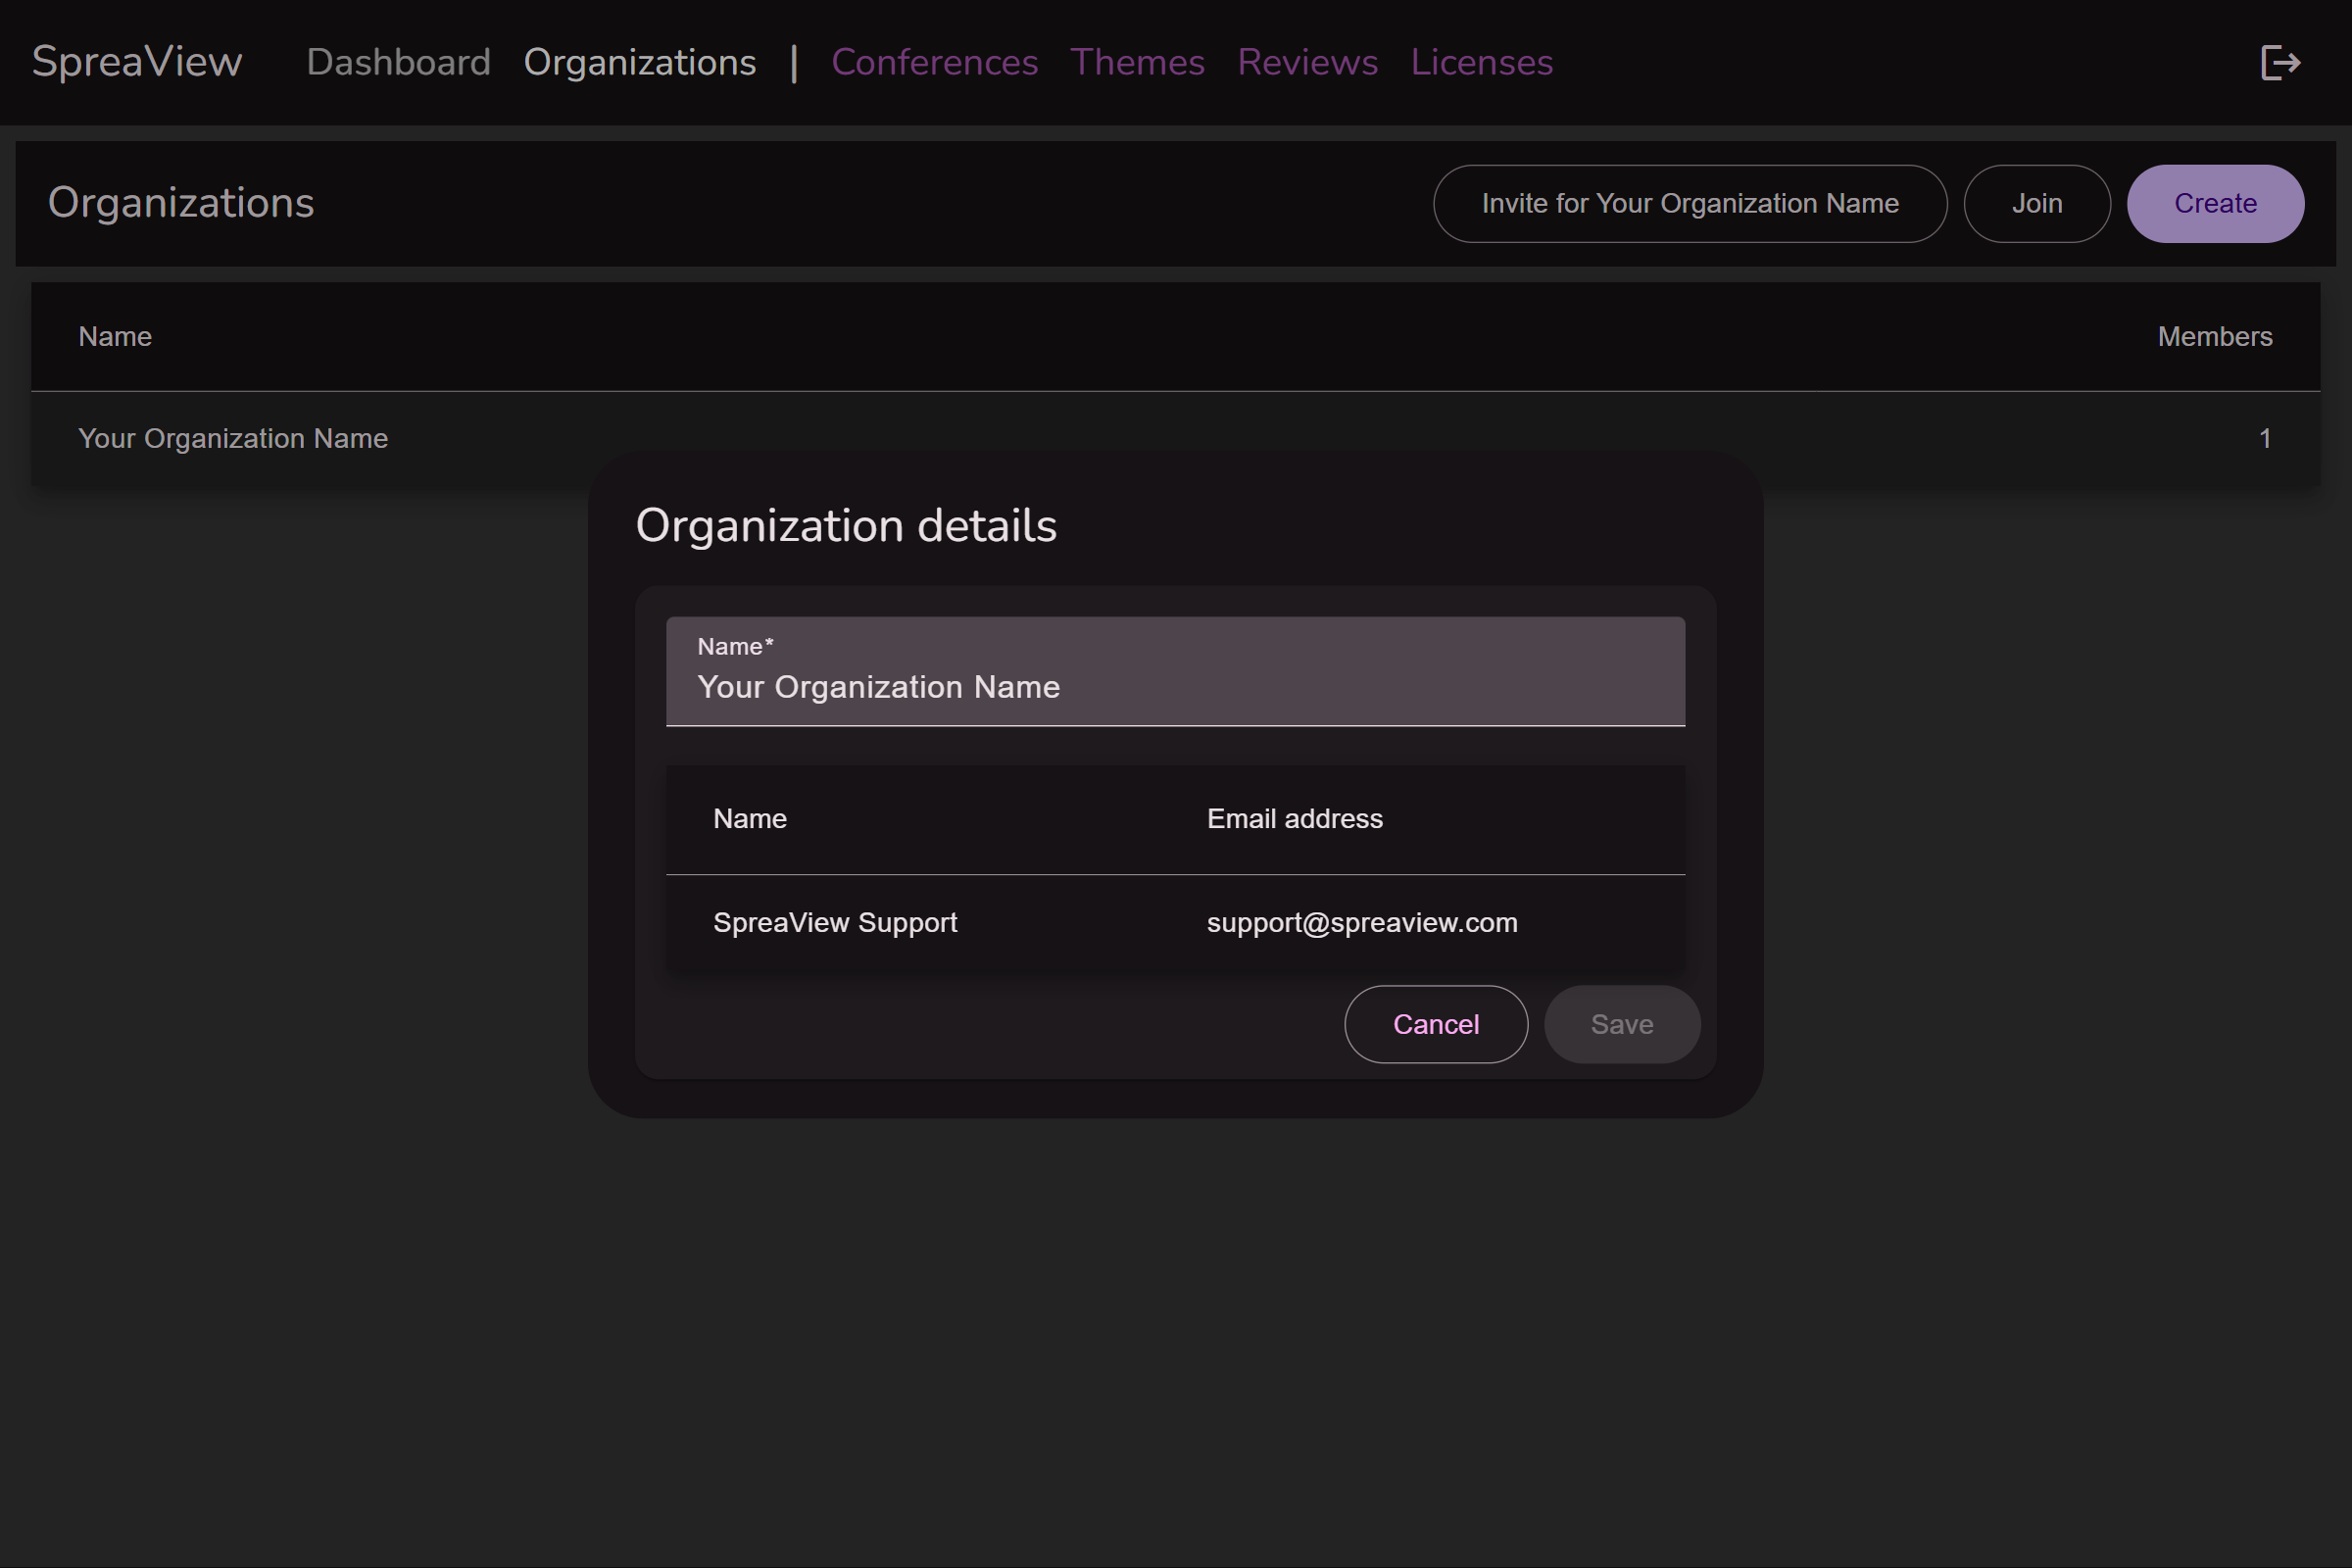
Organization details
If you click on the name of one of your organizations, you will open its details. Here, you can change the name of the organization, but also invite others to join your organization.
Working Under an Organizational Context
In our software system, it is mandatory for all users, specifically organizers, to operate within the context of an organization. This ensures that all actions, events, and tasks are correctly associated with the appropriate organizational entity.
Single Organization Membership
If you are an organizer who belongs to only one organization, the system automatically sets you to work under the context of that organization. You will not need to manually select an organization, and all your activities will be associated with this default organization.
Multiple Organization Memberships
For organizers who are members of multiple organizations, a drop-down menu will appear in the upper right corner of your interface. This drop-down allows you to select which organization you are currently working under. The selected organization becomes the “active” organization, and all your actions will be linked to this chosen context.
How to Select an Organization:
- Locate the drop-down box in the upper right corner of your screen.
- Click on the drop-down box to view a list of all organizations you are a member of.
- Select the organization you wish to work under.
- The interface will update to reflect your choice, and you can now proceed with your tasks within the context of the selected organization.

Important: Always ensure you have the correct organization selected before performing any actions, as all tasks, events, and data entries will be tied to the active organization.
Working Under an Organization in SpreaView
SpreaView provides a collaborative environment for managing conferences by allowing users to work within the context of an organization. This document explains how organizations work in SpreaView and the collaborative features available.
What is an Organization in SpreaView?
An organization in SpreaView represents a group of people working together on conferences. By joining an organization, users can share access to all conference-related information and tools, enabling seamless collaboration.
Inviting Other Organizers
Accessing the Organization Settings
- Navigate to your organization’s dashboard.
- Locate the Invite Members option in the organization settings menu.
Sending Invitations
- Enter the email address of the person you wish to invite.
- Click Send Invitation. The recipient will receive an email with instructions on how to join the organization.
Joining the Organization
- The invited user can accept the invitation by entering the invitation code in the email.
- Once accepted, they will be added as a member of the organization and gain full access to its conferences and tools.
Collaboration Within an Organization
SpreaView simplifies collaboration by providing equal access to all members of an organization. This means:
- Shared Access: All members can view and edit the same conference data, reports, and evaluations.
- Real-Time Collaboration: Changes made by one member are immediately visible to others.
Important Note: No Roles or Permissions System
SpreaView operates without a roles or permissions system. All members of an organization have equal rights and access, including the ability to:
- Edit conference details.
- Modify attendee feedback settings.
- Generate and view reports.
This design ensures simplicity and fosters trust among team members but requires careful collaboration and communication to avoid conflicts.
Conclusion
Working under an organization in SpreaView allows multiple users to collaborate effectively on conferences. While the lack of a roles or permissions system simplifies management, it also emphasizes the importance of teamwork and transparency. Invite your team members today and start working together effortlessly!
1.3 - Conferences
Running a conference, now we’re talking!
Before you can collect speaker evaluations in SpreaView, you need to create a conference. All conferences are created within the context of an organization, which acts as the umbrella for your events.
Prerequisite: Select the Right Organization
Every conference belongs to an organization. If you’re part of multiple organizations, make sure you are working under the correct one.
- Use the cog wheel icon in the top-right corner of the screen to switch organizations.
- The current organization is always shown next to the cog wheel for reference.
You can only create a conference if you are assigned to at least one organization.
Creating a New Conference
Once you’re in the correct organization context, follow these steps to create a new conference:
- Go to the Conferences section in the sidebar.
- Click Create.
- Fill in the required details (see below).
- Click Save to create your conference.
When setting up a new conference, the following details are mandatory:
1. Event Name
The official name of your event or conference (e.g., Tech Summit 2025). This name will be visible in dashboards and reports.
2. Date Range
Select the start and end date of your conference.
- For a one-day event, simply select the same date twice.
- The date range determines when sessions can be scheduled.
3. Default Session Duration (in minutes)
This value is used when manually adding sessions later.
- The default value is 50 minutes.
- The end time of a session is automatically calculated by adding this duration to the session’s start time.
- Example: If the default is set to 45 minutes, a session starting at 10:00 will end at 10:45 by default.
4. Default Review Window Duration (in hours)
This defines how long each session can be reviewed after it starts.
- The default value is 4 hours.
- Example: If a session starts at 14:00 and the review window is set to 4 hours, attendees can submit evaluations until 18:00.
Conference Details Page
After creating a conference in SpreaView, you can access its details page to manage and fine-tune various settings. This page includes all the basic information you entered during creation, as well as advanced configuration options that help tailor the evaluation experience to your event.
Basic Properties
These are the core fields shown both during creation and on the details page:
- Event Name: The title of your conference or event.
- Date Range: Start and end dates of the event. For a one-day event, both dates are the same.
- Default Session Duration: Default session length (in minutes), used when adding sessions manually.
- Default Review Window Duration: Default time window (in minutes) during which a session can be reviewed after its scheduled start time.
Additional Properties
The Conference Details page reveals a number of additional fields that allow more customization and control over your event’s configuration.
Event Code
A unique identifier for your conference, automatically generated by SpreaView. This code is used internally and can also be referenced in integrations. This code is read-only and cannot be changed.
Event Description
An optional text field where you can provide more context or information about your event.
Conference Topics
Define a list of topics relevant to your event (e.g., AI, Web Development, Cloud). These can be assigned to sessions to help categorize them and analyze feedback across different themes.
Sessionize API ID
If you’re using Sessionize to manage your speaker and session data, you can link it here by providing the Sessionize API ID. This enables automated session import and syncing.
Swag Requirement Threshold
Specify the amount of sessions conference attendees must review to qualify for a prize draw *
Theme
Apply a visual theme to your conference’s evaluation forms and speaker pages to align them with your event branding.
*) To make the prize draw work, attendees must leave their name and review at lease the set amount of reviews. So setting up a prize draw with raising the threshold above 0 does not make sense if you don’t enable requesting an attendee name
Evaluation Options
These toggles control the behavior of the session evaluation forms and speaker feedback pages:
When enabled, a free-text comment field is added to the evaluation form, allowing attendees to leave qualitative feedback in addition to star ratings. When enabled, the free comment field is shown on review pages. The comment field will always be optional and cannot be configured to be mandatory.
Request Reviewer Name
Enable this to optionally ask attendees to provide their name when submitting a review. This can encourage accountability and personalized feedback, but remains optional for the reviewer. Reviewers will be progressively asked for their name once. When ignored, reviewers will not be bothered again, instead they can enter or change their name manually.
Show Session Ranking on Speaker Review Page
This setting controls whether a speaker can see how their session ranks compared to others at the conference. If enabled, the speaker report will display relative performance metrics.
Editing and Saving Changes
To edit any of the conference details:
- Navigate to your organization’s Conferences section.
- Select the desired conference.
- Update any fields or toggle settings as needed.
- Click Save to apply your changes.
1.4 - Conference Content
Adding a meaning to your conferences
Managing Conference Content in SpreaView
The Conference Content section in SpreaView enables organizers to manage the essential elements of a conference, including speakers, tracks, and presentations. This functionality provides flexibility while ensuring data consistency.
Tip read on to the end of the page and learn how to synchronize your conference content with Sessionize.
Managing Speakers
Organizers can add and edit speakers for the conference.
Key Points:
- Adding Speakers: New speakers can be added to the conference through this section.
- Editing Speakers: Speaker details can be updated as necessary.
- Restrictions:
- Speakers who are assigned to one or more presentations cannot be deleted. This ensures the integrity of presentation data.
Managing Tracks
Tracks represent the divisions or categories of sessions within a conference.
Key Points:
- Adding Tracks: Organizers can create new tracks to categorize sessions.
- Editing Tracks: Existing tracks can be updated.
- Deleting Tracks:
- Tracks can only be deleted if no presentations are assigned to them.
Managing Presentations

Presentations are the core components of a conference, linking speakers and tracks to the conference schedule.
Key Points:
- Adding Presentations: Organizers can create new presentations by assigning:
- A title.
- One or more speaker(s).
- A track.
- Start time and duration.
- Editing Presentations: Details of existing presentations can be modified.
Synchronizing content with Sessionize
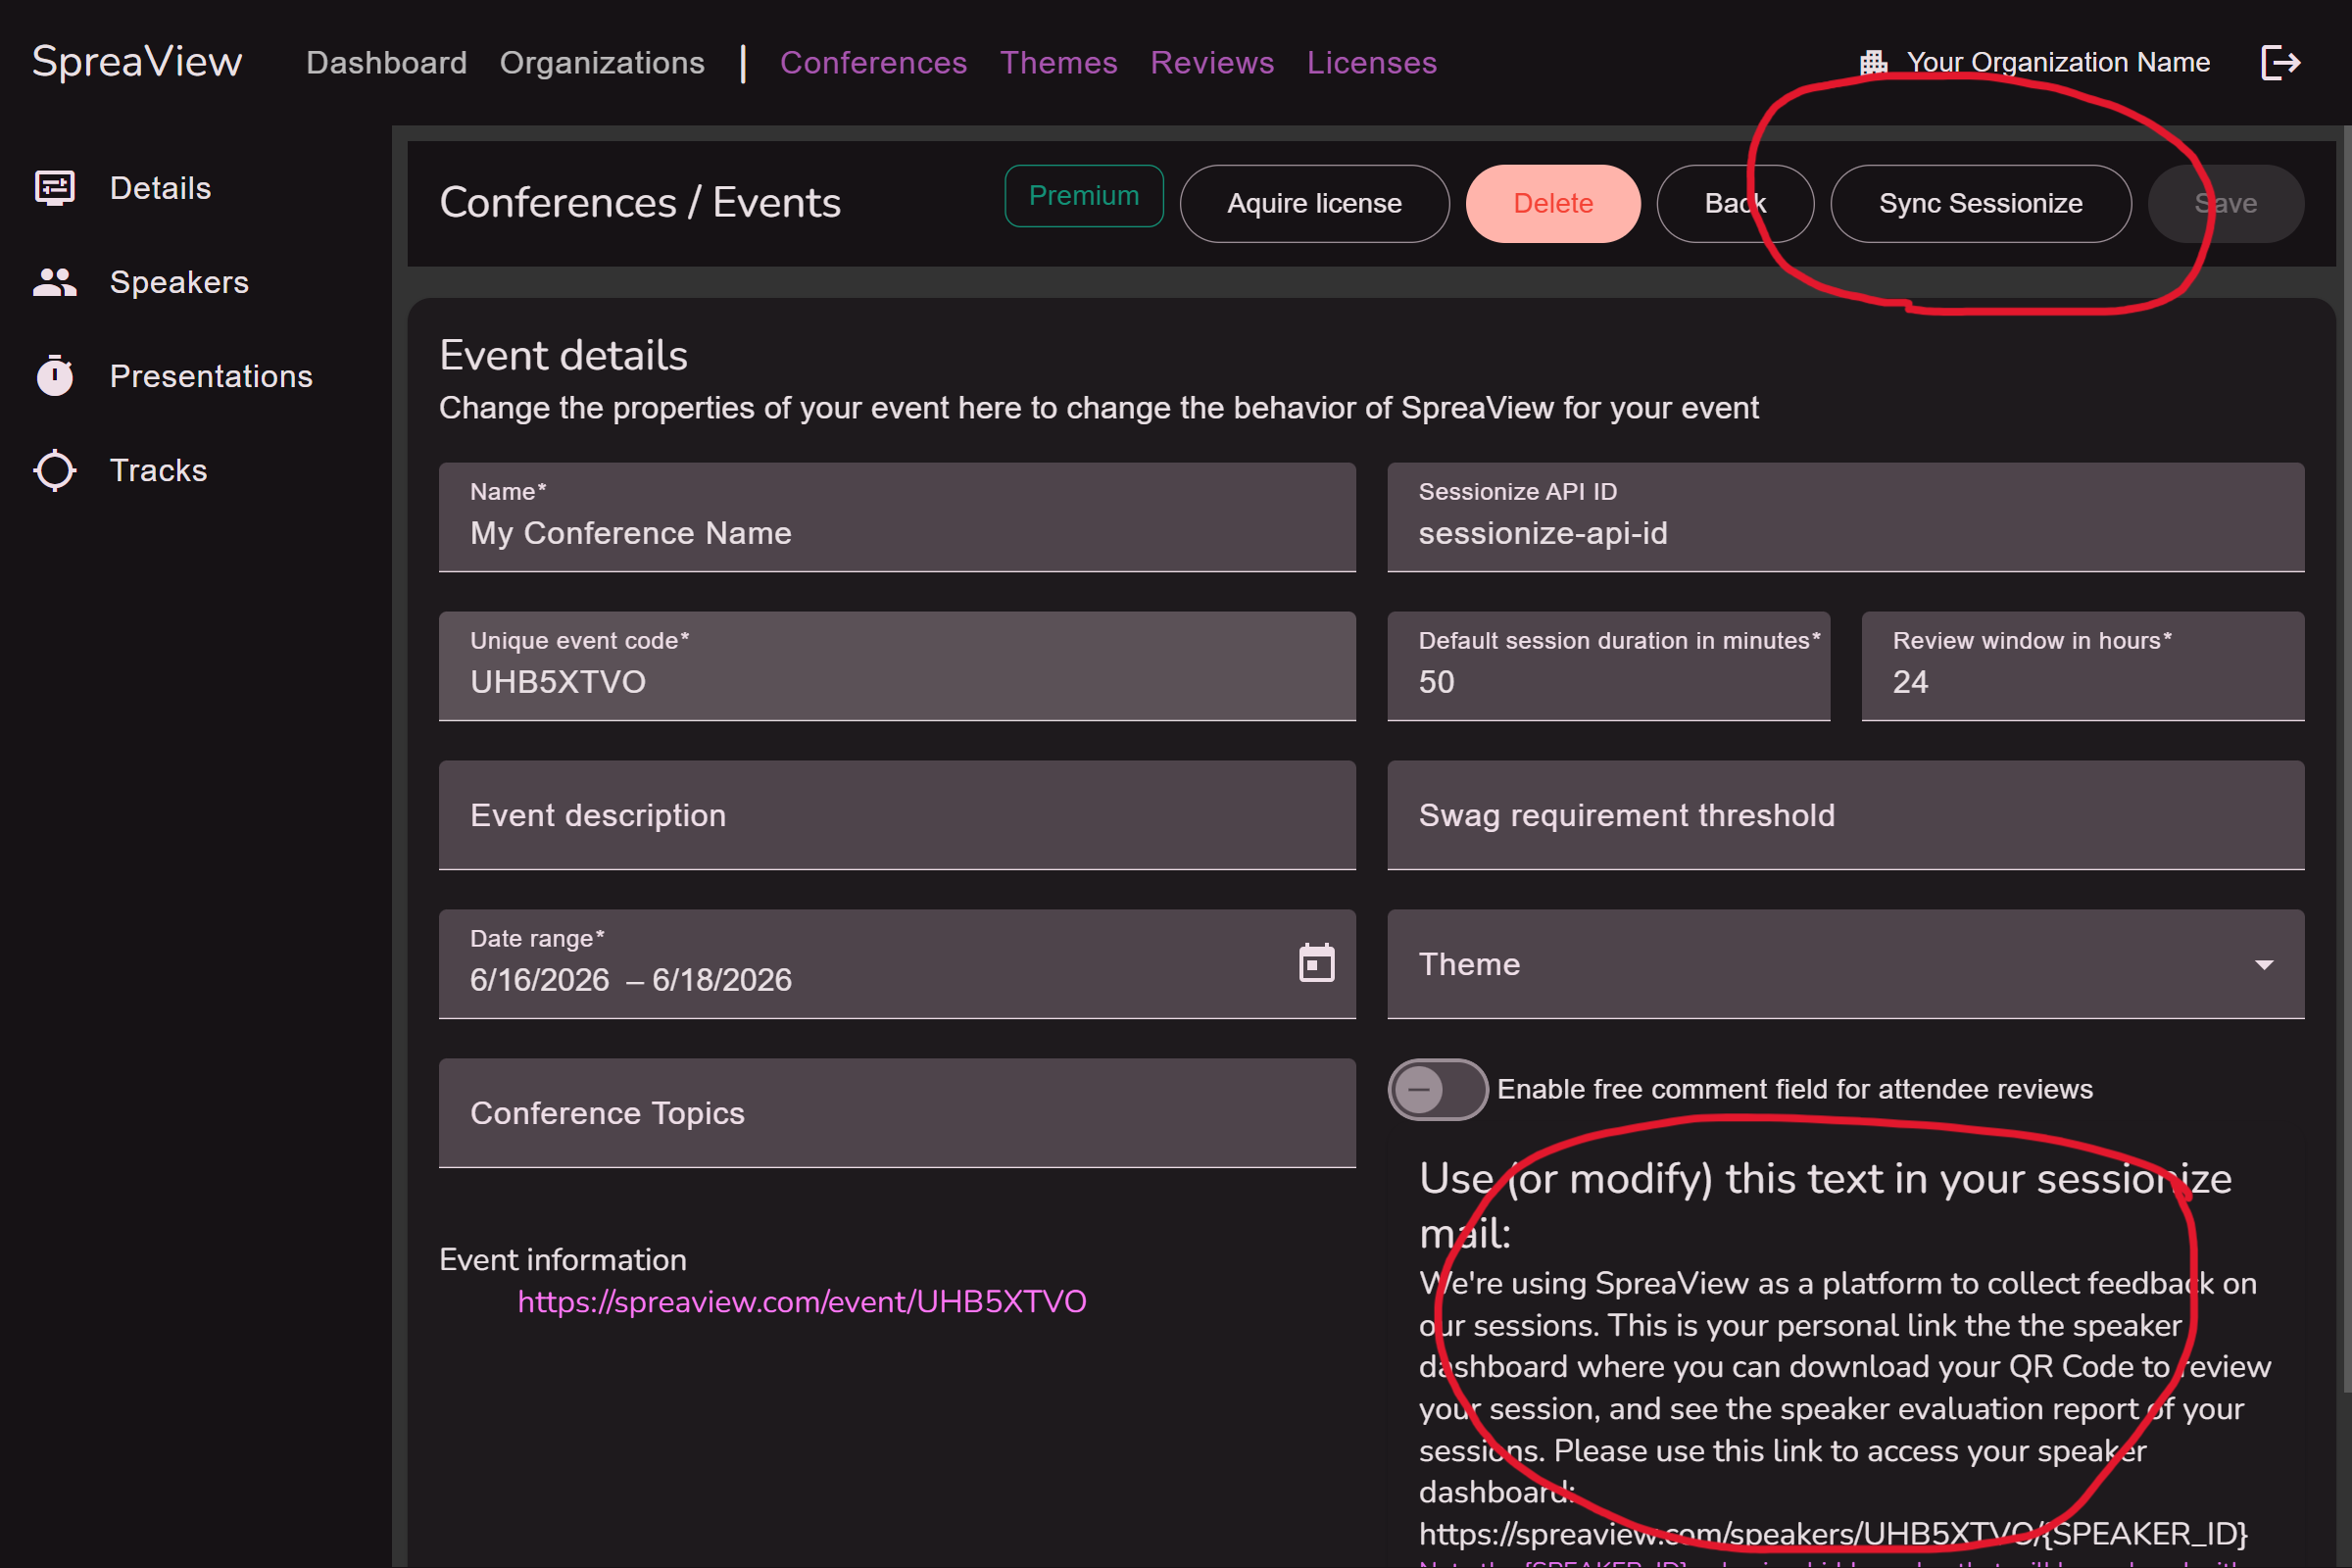
Sessionize is a platform that allows conference organizers to select speakers and set up a schedule for their conference. SpreaView seamlessly integrates with Sessionize and allows you to synchonize your SpreaView conference data with Sessionize. It is important to understand that when setting up this synchronization, Sessionize is leading and SpreaView only downloads information from Sessionize. On this page you can learn how to set up Sessionize to allow the synchronization. This leaves you with a Session API Id. Enter this ID on the details page of your SpreaView conference to enable the Syncronize button. Click this button to synchronize the session data with Sessionize’s data.
When importing data from Sessionize, the default presentation time is not respected. The full date and time schedule as imported from Sessionize is used instead.
Note that when the Sessionize API Id is populated, also a short email template will be shown at the bottom of the screen. The email template text can be used when you communicate with your speakers from Sessionize. By default, SpreaView does not keep speaker email addresses so SpreaView cannot send emails to your speakers. Sessionize can, and by using the adjustable template as shown, you create a seamless experience for your speakers.
Summary
The Conference Content section is a vital tool for organizing and structuring conferences in SpreaView. By allowing organizers to manage speakers, tracks, and presentations effectively, SpreaView ensures that conferences are flexible yet maintain consistent and accurate data. Note the restrictions in place to avoid accidental data loss or conflicts when managing these components.
1.5 - Theming
Make sure you pick the appropriate plan ;)
Managing Themes in SpreaView
Theming in SpreaView allows organizers to customize the look of review pages for attendees in a restricted yet effective way. Themes enhance the attendee experience by ensuring a visually cohesive design that aligns with the conference’s branding.
Theming Features
Organizers can use theming to:
- Change the Title Bar Color: Adjust the color of the title bar for the review pages.
- Customize Title Bar Text Color: Select a text color that complements the title bar.
- Add a Conference Logo: Upload a logo to personalize the review pages.
Creating and Managing Themes
Themes are independent entities in SpreaView, meaning they can be created once and reused across multiple conferences.
Creating a Theme
- Navigate to the Themes section in SpreaView.
- Define the desired:
- Title bar color.
- Title bar text color.
- Conference logo (optional).
- Save the theme for future use.
Assigning a Theme to a Conference
- On the Details Page of a conference, organizers can select one of the predefined themes to apply to the review pages.
- Themes can be assigned regardless of the conference’s license plan.
License Considerations
While themes can be created and assigned freely, they will only be visible on the review pages if the conference has an appropriate license.
Benefits of Reusable Themes
- Efficiency: Create a theme once and apply it to multiple conferences.
- Consistency: Maintain a uniform look across events organized under the same brand.
Summary
Theming in SpreaView is a powerful tool for branding and attendee engagement. It offers flexibility to create visually appealing review pages while ensuring themes are reusable and accessible across different conferences. Regardless of the license plan, organizers can manage themes freely, making SpreaView a versatile platform for event customization.
1.6 - Speakers
Provide valuable feedback for your speakers
SpreaView provides a centralized system for managing speaker registrations and data. This allows speakers to access their personal information and conference-related details beyond the boundaries of a single organization. Speakers involved in multiple conferences can view and manage all their data from a single Speaker Dashboard.
Speaker Registration
Speakers must register in SpreaView to access their dashboard and related information. Registration ensures a seamless experience for speakers across various conferences.
Inviting Speakers
You can invite speakers to SpreaView through two methods:
Manual Invitation:
- Add the speaker’s details manually within SpreaView and send an invitation.
External System Integration:
- Use an external system like Sessionize to send automated invitations to speakers.
When a speaker receives an invitation, they are directed to a dedicated invitation page where they can:
- Register or Log in to SpreaView.
- Opt-out of SpreaView. Opting out will anonymize their data and revoke access to the Speaker Dashboard.
Speaker Dashboard
The Speaker Dashboard is the central hub for speakers, providing access to their conference participation data. It consists of two main sections:
Future Conferences
- Displays a comprehensive list of upcoming conferences where the speaker is scheduled to present.
- Each entry includes:
- The presentation title.
- Start time.
- Track information.
- Speakers can download a unique QR code for each presentation from this section. This QR code allows attendees to submit reviews for the presentation.
Past Presentations
- Lists all presentations that the speaker has already delivered.
- Each entry provides:
- A brief summary of review information for the session.
- A link to access the Presentation Report.
Presentation Report
The Presentation Report offers detailed insights into a session’s reviews, including:
- Comprehensive attendee feedback.
- Comparisons with other speakers at the same conference.
- Comments left by attendees.
Summary
SpreaView’s centralized approach to speaker management ensures that speakers have full visibility of their data and insights across multiple conferences. By registering in SpreaView, speakers can:
- Access their schedules for future conferences.
- Download QR codes for collecting reviews.
- Analyze feedback and performance metrics for past presentations.
For additional assistance with managing speakers or integrating external systems like Sessionize, please contact our support team at support@spreaview.com.
2 - Organizations
Organizing events and conferences under an umbrella
In SpreaView, organizations are the top-level entities under which all conferences are created and managed. An organization represents your team, company, or community and serves as a container for conferences, users, and settings.
What Is an Organization?
An organization groups users and conferences together. This allows for:
- Shared access to conferences by multiple team members.
- Centralized management of all speaker evaluation data.
- Clear separation between events from different groups or clients.
Example: If you run both a local meetup and a yearly conference, you can create a separate organization for each to keep their data and teams independent.
Creating an Organization
To create a new organization:
- Navigate to the Organizations section.
- Click Create Organization.
- Enter a name for your organization.
- Save your changes.
You can create multiple organizations if needed—for instance, one per event series or department.
Renaming an Organization
Organizations can be renamed at any time:
- Open the organization settings.
- Click Edit Name.
- Update the name and save.
Note: Renaming does not affect your conferences or users—only the display name is changed.
Organization Deletion
Organizations cannot be deleted. This is to ensure that historical data and feedback associated with conferences remain accessible and intact.
Switching Between Organizations
If you are a member of multiple organizations, you can switch between them using the cog wheel icon in the top-right corner of the screen.
- The currently active organization is always displayed next to the icon.
- All actions—like creating conferences or viewing dashboards—apply to the selected organization only.
Summary
- ✅ Organizations group conferences and users.
- ✅ You can create and rename organizations.
- 🚫 Organizations cannot be removed.
- 🔁 Easily switch between organizations via the top-right cog wheel.
2.1 - Invitations
Inviting others to join your organization
Collaboration is a key part of managing conferences in SpreaView. As a member of an organization, you can invite other users to join your organization and help manage conferences, sessions, and evaluations.
Who Can Invite?
Any existing member of an organization can invite others to join that same organization.
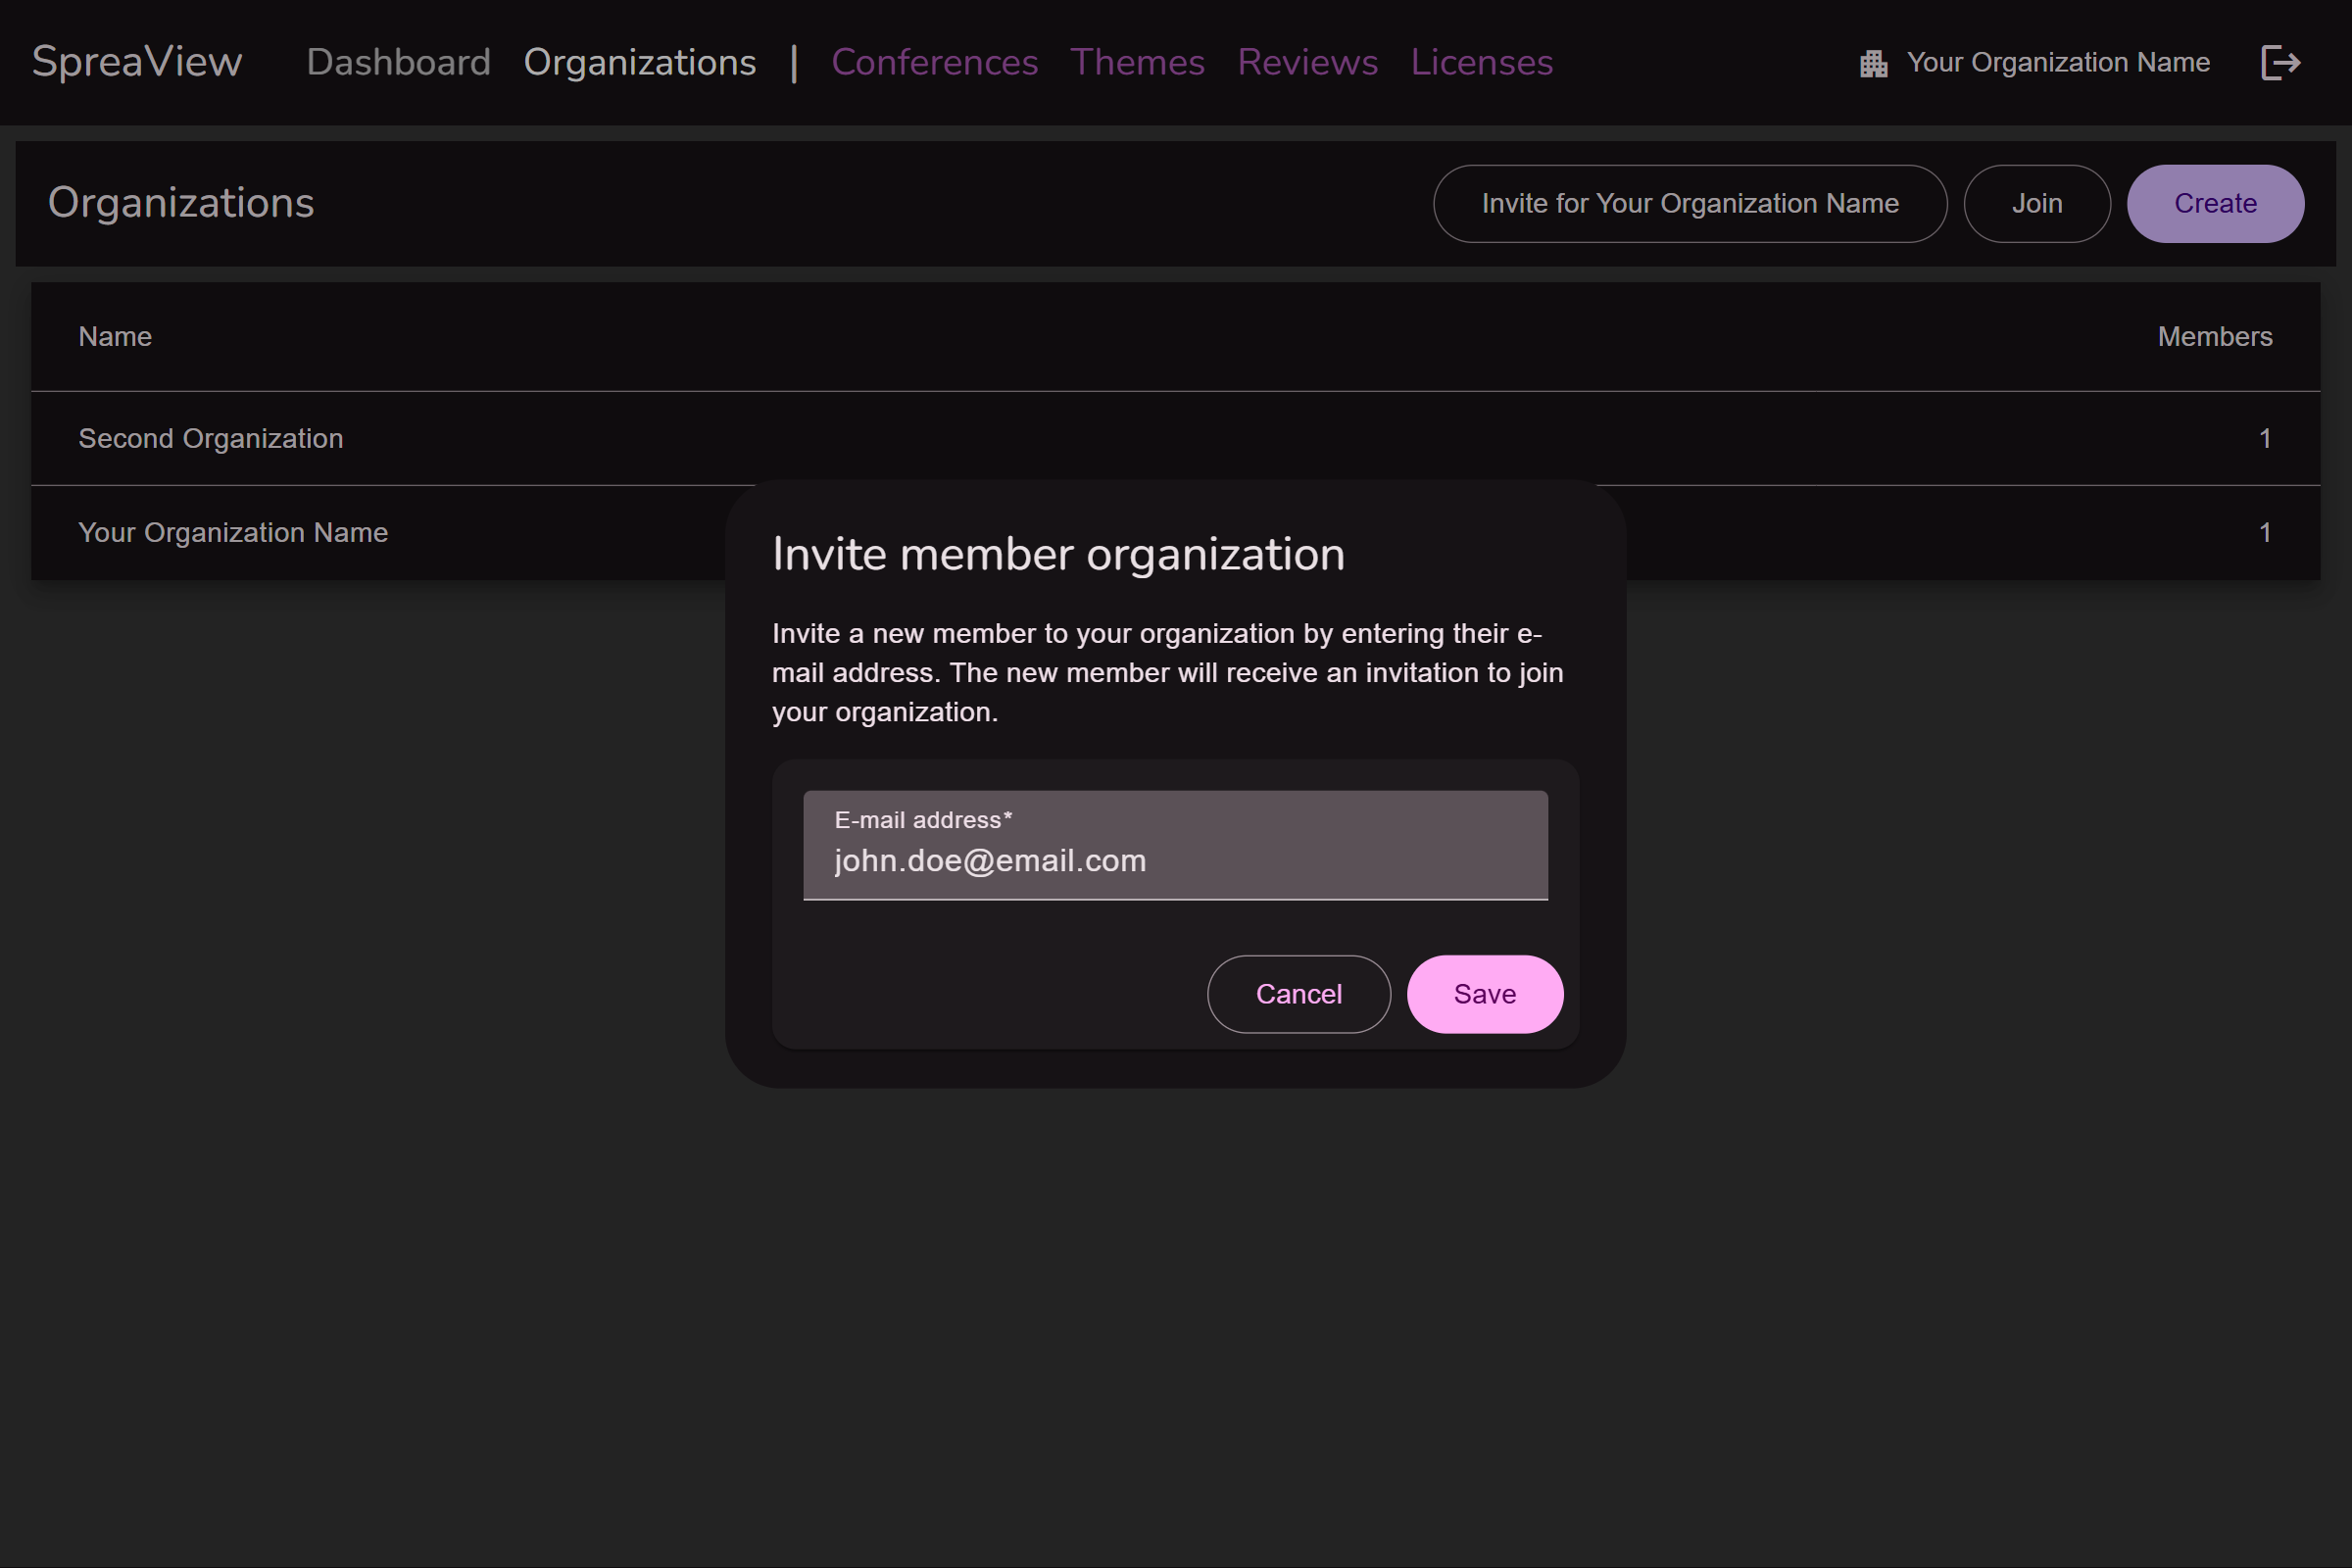
How to Invite Someone
- Navigate to the Organizations page.
- Click the “Invite for [Organization Name]” button.
– This button reflects the currently active organization.
- On the invitation screen, enter the email address of the person you want to invite.
- Click Save to complete the invitation.
If you want to invite someone to a different organization, use the cog wheel in the top-right corner of the screen to switch to the appropriate organization first.
Email Address Notes
- The email address you provide does not have to match the email the user registered with in SpreaView.
- The email address is only used to deliver the invitation code.
What Happens Next?
Once the invitation is saved:
- The invited person receives an email containing an invitation code.
- They can use this code to join your organization by entering it in their SpreaView dashboard.
Summary
- ✅ You can invite collaborators to your organization.
- ✉️ Invitations are sent via email with a unique code.
- 🔐 The invitation code allows users to securely join your organization.
- 🔁 Use the cog wheel to select the correct organization before inviting.
2.2 - Joining
Joining an organization
In SpreaView, all conferences are created and managed within the context of an organization. Before you can collaborate on events, you must be a member of at least one organization. There are two ways to join an organization: by entering an invitation code or by creating your own organization.
Joining an Organization as a New User
When you first sign up for SpreaView, you’ll be directed to your personal dashboard. From here, you can choose to:
- Join an existing organization, using an invitation code someone sent you.
- Create a new organization, if you’re starting fresh.
Joining with an Invitation Code
- Locate the invitation code you received via email.
- Enter the code in the “Join Organization” field on your dashboard.
- Click the Join button.
Once the code is accepted, you’ll be added to the organization immediately and can start collaborating on conferences.
Joining Additional Organizations (For Existing Users)
If you’re already a member of one or more organizations and wish to join another, follow these steps:
- Go to the Organizations page in the navigation menu.
- Click the Join button at the top of the page.
- A popup will appear prompting you to enter the invitation code.
- Enter the code and confirm by clicking Join.
You will then be added to the new organization, and it will appear in your organization switcher (accessible via the cog wheel in the top-right corner).
Notes
- An invitation code is required to join an organization
- You can belong to multiple organizations at the same time and switch between them as needed.
Summary
- 🆕 New users can join or create an organization from their dashboard.
- ✉️ Use an invitation code to join an existing organization.
- 🔁 Existing users can join additional organizations from the Organizations page.
- ⚙️ Use the cog wheel to switch between your organizations at any time.
3 - Conferences
Conferences, events, meetups all come together here
At the heart of SpreaView are conferences, the events where sessions take place, speakers present, and evaluations are collected. Whether you’re organizing a local meetup, a multi-day conference, or a recurring event, SpreaView helps you structure and manage feedback collection effectively.
This section of the documentation will guide you through everything related to conferences, including how to:
- Create a new conference within an organization
- Configure key properties such as session duration, review windows, and topics
- Link your event with external systems like Sessionize
- Manage evaluations, feedback visibility, and customization options
- Invite others to collaborate on your conference setup
The Role of Conferences
Conferences are always created within an organization, allowing teams to collaborate on event planning, session setup, and speaker evaluations. Each conference can be customized to fit the specific needs of your event, from branding to evaluation policies.
A single organization can host multiple conferences, making it easy to manage separate events under a single collaborative umbrella.
What You’ll Find in This Section
Getting Started
If you haven’t already created an organization, head to the Getting Started Guide to set one up first—since every conference must be part of an organization.
Ready to begin? Start with Creating a Conference to launch your first event in SpreaView.
Would you like a version of this page that includes visual examples or a table of contents with collapsible sections?
3.1 - New conferences
Creating a new conference, quickly and easily
Before you can collect speaker evaluations in SpreaView, you need to create a conference. All conferences are created within the context of an organization, which acts as the umbrella for your events.
Prerequisite: Select the Right Organization
Every conference belongs to an organization. If you’re part of multiple organizations, make sure you are working under the correct one.
- Use the cog wheel icon in the top-right corner of the screen to switch organizations.
- The current organization is always shown next to the cog wheel for reference.
You can only create a conference if you are assigned to at least one organization.
Creating a New Conference
Once you’re in the correct organization context, follow these steps to create a new conference:
- Go to the Conferences section in the sidebar.
- Click Create.
- Fill in the required details (see below).
- Click Save to create your conference.
When setting up a new conference, the following details are mandatory:
1. Event Name
The official name of your event or conference (e.g., Tech Summit 2025). This name will be visible in dashboards and reports.
2. Date Range
Select the start and end date of your conference.
- For a one-day event, simply select the same date twice.
- The date range determines when sessions can be scheduled.
3. Default Session Duration (in minutes)
This value is used when manually adding sessions later.
- The default value is 50 minutes.
- The end time of a session is automatically calculated by adding this duration to the session’s start time.
- Example: If the default is set to 45 minutes, a session starting at 10:00 will end at 10:45 by default.
4. Default Review Window Duration (in hours)
This defines how long each session can be reviewed after it starts.
- The default value is 4 hours.
- Example: If a session starts at 14:00 and the review window is set to 4 hours, attendees can submit evaluations until 18:00.
3.2 - Details
Change conference properties at any time
After creating a conference in SpreaView, you can access its details page to manage and fine-tune various settings. This page includes all the basic information you entered during creation, as well as advanced configuration options that help tailor the evaluation experience to your event.
Basic Properties
These are the core fields shown both during creation and on the details page:
- Event Name: The title of your conference or event.
- Date Range: Start and end dates of the event. For a one-day event, both dates are the same.
- Default Session Duration: Default session length (in minutes), used when adding sessions manually.
- Default Review Window Duration: Default time window (in minutes) during which a session can be reviewed after its scheduled start time.
Additional Properties
The Conference Details page reveals a number of additional fields that allow more customization and control over your event’s configuration.
Event Code
A unique identifier for your conference, automatically generated by SpreaView. This code is used internally and can also be referenced in integrations. This code is read-only and cannot be changed.
Event Description
An optional text field where you can provide more context or information about your event.
Conference Topics
Define a list of topics relevant to your event (e.g., AI, Web Development, Cloud). These can be assigned to sessions to help categorize them and analyze feedback across different themes.
Sessionize API ID
If you’re using Sessionize to manage your speaker and session data, you can link it here by providing the Sessionize API ID. This enables automated session import and syncing.
Swag Requirement Threshold
Specify the amount of sessions conference attendees must review to qualify for a prize draw *
Theme
Apply a visual theme to your conference’s evaluation forms and speaker pages to align them with your event branding.
*) To make the prize draw work, attendees must leave their name and review at lease the set amount of reviews. So setting up a prize draw with raising the threshold above 0 does not make sense if you don’t enable requesting an attendee name
Evaluation Options
These toggles control the behavior of the session evaluation forms and speaker feedback pages:
When enabled, a free-text comment field is added to the evaluation form, allowing attendees to leave qualitative feedback in addition to star ratings. When enabled, the free comment field is shown on review pages. The comment field will always be optional and cannot be configured to be mandatory.
Request Reviewer Name
Enable this to optionally ask attendees to provide their name when submitting a review. This can encourage accountability and personalized feedback, but remains optional for the reviewer. Reviewers will be progressively asked for their name once. When ignored, reviewers will not be bothered again, instead they can enter or change their name manually.
Show Session Ranking on Speaker Review Page
This setting controls whether a speaker can see how their session ranks compared to others at the conference. If enabled, the speaker report will display relative performance metrics.
Editing and Saving Changes
To edit any of the conference details:
- Navigate to your organization’s Conferences section.
- Select the desired conference.
- Update any fields or toggle settings as needed.
- Click Save to apply your changes.
3.3 - Speakers
Speakers are one or more persons delivering a presentation on your conference
In SpreaView, speakers are a fundamental part of every conference. They are linked to the sessions they deliver and are the primary recipients of evaluation feedback from attendees. This documentation page explains how speakers work, how they are managed within conferences, and how SpreaView handles speaker data across events.
How Speakers Work
SpreaView treats speakers in two ways:
- Per-conference: Speakers are added to individual conferences and assigned to sessions within that context.
- Globally: Speakers are also tracked centrally across all conferences, allowing each speaker to have their own dashboard showing feedback and sessions from multiple events.
This makes SpreaView especially useful for recurring speakers and multi-event organizations.
Adding Speakers to a Conference
Before you can assign a speaker to a session, you must first add them to your conference.
To add a speaker:
- Go to the Speakers section within your conference.
- Click Add Speaker.
- Enter the speaker’s name and any relevant details.
- Save your changes.
Once a speaker is added to the conference, you can assign them to sessions and track their evaluations.
⚠️ You cannot assign a speaker to a session unless they are part of the conference.
Importing Speakers Automatically
If you’re using an external system like Sessionize to import sessions, SpreaView will:
- Automatically create speaker entries in your conference for any speaker linked to an imported session.
- Ensure that speakers are properly associated with their sessions without requiring manual setup.
This saves time and reduces the risk of data entry errors when working with large numbers of sessions.
Speaker Dashboards
Speakers can log into SpreaView to access their personal dashboard, which includes:
- A list of their sessions across all conferences they’ve spoken at
- Session-level ratings and evaluation breakdowns
- Optional free-text comments (if enabled by the organizer)
- Rankings and performance comparisons (if enabled by the organizer)
This centralized feedback experience makes SpreaView a powerful tool for speaker growth and session refinement.
Summary
- 🧑🏫 Speakers belong to conferences and are assigned to sessions.
- 🌐 SpreaView maintains a central speaker record so speakers can view all their sessions in one place.
- 🔄 Speakers are added automatically when importing from external sources like Sessionize.
- ✅ Speakers must be added to a conference before assigning them to sessions.
Next: Managing Tracks
3.4 - Tracks
Physical locations where presentations are hosted, also referred to as rooms.
Tracks (also referred to as rooms) represent the physical locations where sessions take place during a conference. Every presentation in SpreaView must be assigned to a track, as this ensures that session reviews can be tied to the correct location and schedule.
Why Tracks Matter
Tracks are more than just room names—they are a foundational part of how SpreaView helps organizers gather and manage feedback. They provide:
- Structure for session scheduling
- Location context for attendees and organizers
- Track-specific QR codes that link attendees directly to the review page for the currently running session
Creating Tracks
Before you can add presentations or sessions to your conference, you must first create at least one track.
To create a track:
- Go to the Tracks section in your conference dashboard.
- Click Add Track.
- Enter the name of the track (e.g., “Room A”, “Main Hall”, “Track 1”).
- Save your changes.
Once created, tracks can immediately be assigned to sessions.
⚠️ Presentations cannot be created or imported without at least one track.
Automatic Import of Tracks
If you’re importing sessions from an external source (such as Sessionize):
- SpreaView will automatically create tracks based on the rooms or tracks defined in the external system.
- Sessions will be automatically assigned to the appropriate tracks during the import process.
This ensures consistency and saves time, especially for large-scale events.
Track-Based Review QR Codes
One of the powerful features of SpreaView is the track-specific QR code:
- Each track has its own unique URL and QR code.
- When scanned, the QR code leads attendees to the currently active presentation on that track.
- When a new presentation starts on the track, the URL automatically switches to the new presentation’s evaluation page.
This enables organizers to:
- Print and place track-specific QR codes in the physical rooms.
- Let attendees review presentations in real time, without needing to search or navigate manually.
🖨️ Many organizers choose to print QR codes for each track and place them on walls, doors, or presentation screens.
Summary
- 🏛️ Tracks represent rooms or areas where sessions happen.
- 🧭 A session must be assigned to a track.
- 🔁 Tracks and assignments are automatically imported when using external systems.
- 📱 Each track has a dynamic QR code that always points to the current session.
3.5 - Presentations
Presentations are delivered by speakers on a given track ;)
In SpreaView, presentations (or sessions) are the core content of any conference. They are what attendees experience and review, and what speakers are evaluated on. Presentations are always part of a conference and must be properly configured to ensure accurate scheduling and meaningful feedback collection.
Presentation Overview
Each presentation in SpreaView includes the following:
- Title – The name of the session or talk.
- Abstract – A brief description or summary of the content.
- Presentation Code – A unique, read-only identifier automatically assigned to each presentation.
- Speakers – One or more speakers associated with the session.
- Track – The room or location where the session takes place. Assigning a track is mandatory.
- Start and End Date & Time – The scheduled time for the presentation.
All these fields work together to ensure attendees can review the correct session and that speakers receive timely feedback.
Required Fields
To create a presentation, you must provide:
- A title
- At least one speaker
- An assigned track
- A start time and end time
⚠️ A presentation cannot be created without assigning a valid track and at least one speaker.
Review Time Windows
Review availability for presentations is automatically determined by your conference settings:
- Each conference defines a default review window duration (e.g., 4 hours).
- The review period starts at the session’s scheduled start time and ends after the configured duration.
- This ensures attendees can leave feedback in a timely and relevant window after attending a presentation.
Speaker Feedback Access
All speakers assigned to a presentation can:
This helps speakers improve their sessions and gain insight into how their talks are received by attendees.
Summary
- 📄 Presentations contain a title, abstract, and unique code.
- 🧑🏫 They must have at least one speaker and be assigned to a track.
- 🕒 Sessions have scheduled start and end times.
- 📝 Feedback windows are calculated automatically based on conference settings.
- 📊 All assigned speakers can view feedback via their speaker dashboard.
3.6 - Sessionize
Importing data makes life easier
SpreaView allows you to seamlessly import speakers and sessions directly from Sessionize, a platform used for selecting and planning sessions for your conference. This integration simplifies the process of transferring your carefully planned schedule into SpreaView, ensuring that all sessions and speaker information are accurately reflected in your event.
Steps to Import from Sessionize
Plan Your Sessions in Sessionize:
- Begin by using Sessionize to plan and organize your conference sessions. Utilize the Sessionize schedule builder to arrange your sessions and assign speakers to each one.
- Once your schedule is finalized and announced, it’s ready to be imported into SpreaView.
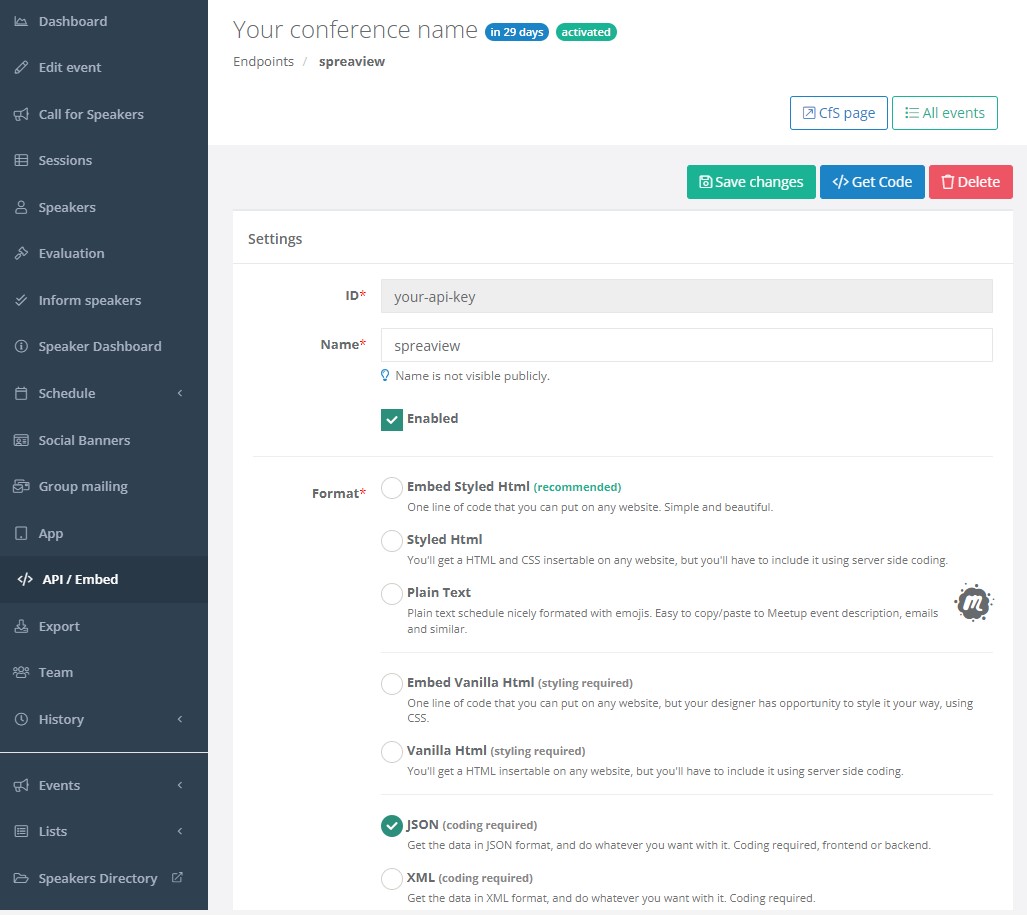
Create an API Key in Sessionize:
- To enable the integration, you need to create an API key in Sessionize. This API key will allow SpreaView to access your session data securely.
- Log in to your Sessionize account and navigate to the API/Embed settings.
- Create a new API specifically for SpreaView. Keep this key secure, as it grants access to your event data.
Importing Data into SpreaView:
- In SpreaView, go to the section where you manage your event.
- Locate the field where you can enter the Sessionize API ID.
- Enter the API key you created in Sessionize when prompted.
Import Data:
- When a Sessionize API Id is specified for your event, a new button appears called ‘Sync with Sessionize.com’. Click it to import data
- After the import process, review the sessions and speakers that have been brought into SpreaView.
- Ensure that all the information is accurate and complete. You may need to adjust session details or speaker assignments within SpreaView based on your specific event needs.
You can import data multiple times. Speakers and sessions will only be changed if changes are made in the Sessionize platform.
Managing Imported Sessions and Speakers:
- Once imported, the sessions and speakers will be fully integrated into your SpreaView event.
- Please note that any changes to session details or speaker information should be made in Sessionize and then re-imported into SpreaView to ensure consistency.
Important Notes:
- API Key Security: Keep your API key confidential, as it provides access to your event data in Sessionize.
- Synchronization: If changes are made in Sessionize after the initial import, you’ll need to re-import the data into SpreaView to capture these updates.
- Sessionize Control: Since sessions and speakers are managed primarily in Sessionize, any edits to their details should be done through the Sessionize platform rather than directly in SpreaView.
This integration ensures a smooth transition from planning your event in Sessionize to executing it in SpreaView, helping you focus on delivering a successful conference.
3.7 - Insights
Get information based on the topics of sessions
Configuring Topics for Your Conference
SpreaView allows conference organizers to define topics that categorize sessions based on their content. This feature is especially powerful when used in combination with a license that includes AI-powered analysis.
🎯 Why Use Topics?
Adding topics to your conference provides you with deeper insights into:
- Which topics attracted the most attendees
- Which topics received the highest or lowest ratings
- How your session content aligns with attendee interests
This helps you make informed decisions when planning future editions of your event.
Not that this feature works best when providing SpreaView with a list of 20 to 30 topics for your conference. This feature will not work when 10 or less topics are provided.
🧠 AI-Assisted Topic Classification
If your conference uses a Professional or Premium license (both of which support AI features), SpreaView will:
- Analyze the abstracts of all presentations.
- Match content with the topics you’ve defined.
- Automatically assign topics to sessions where matches are found.
🔍 This means you don’t need to manually tag each session—SpreaView’s AI does the heavy lifting.
📌 How to Add Topics
- Navigate to your Conference Details page.
- Locate the Topics section.
- Add one or more topics relevant to your event.
(e.g., Cloud Architecture, AI & ML, DevOps, Frontend Design)
Once defined, these topics will be used by SpreaView to classify your sessions intelligently.
📊 Benefits of Topic Analysis
With topics set up, SpreaView can provide:
- Topic popularity: based on number of sessions and attendee feedback
- Engagement metrics: which topics got the most reviews or highest scores
- Balanced programming feedback: helping you plan for future content diversity
This dramatically improves your post-conference evaluation process and helps guide the programming of your next event.
💡 Pro Tip
For best results:
- Choose topics that are broad enough to group multiple sessions, but specific enough to provide meaningful insight.
- Regularly review topic usage and AI categorization results during your schedule-building process.
3.8 - Prize draws
Gamification works! Let’s encourage attendees to leave feedback
To help boost attendee engagement and increase the number of session reviews, SpreaView offers a Prize Draw feature. This feature allows organizers to incentivize attendees to leave feedback by offering a chance to win a prize.
How It Works
When enabled, the Prize Draw feature automatically tracks which attendees qualify based on two criteria:
- They have left feedback for a minimum number of sessions.
- They have entered their name when submitting feedback.
At the end of your event, you can easily run a random draw to select winners from all qualifying reviewers.
Enabling the Prize Draw
To set up a prize draw for your conference, go to the Conference Settings page and configure the following:
1. Swag Requirement Threshold
- This is the minimum number of reviews an attendee must leave to qualify.
- Set this value to any number greater than 0 to enable the prize draw.
- For example, if the threshold is set to
5, only attendees who submit feedback for at least 5 sessions will be eligible.
2. Ask Attendees for Their Names
- This option must be enabled to collect identifiable names with the feedback.
- Without a name, reviewers cannot be included in the draw.
⚠️ Both settings must be enabled. If the swag threshold is 0 or name collection is turned off, the prize draw feature is not available.
Running the Prize Draw
Once your event has ended, you can initiate the prize draw:
Go to the Conference Details page.
Click the “Prize draw” button (visible only if the feature is enabled).
SpreaView will randomly select one attendee from the list of those who:
- Provided a name.
- Left at least the required number of reviews.
The result will show:
- ✅ The attendee’s name — which can be called out on stage.
- 📱 A QR code — which the attendee can scan to confirm their win and identity.
This makes it easy to verify winners live, on-site.
Note that SpreaView values anonymous feedback and thus all entered feedback cannot be tracked back to an individual. There are scenarios where scanning the QR code returns a negative result. Although this should not be a common scenario, organizers must realize it is indeed possible.
Benefits of Using Prize Draws
- 🚀 Encourages more session reviews
- 🎉 Adds a fun, engaging element to your event
- 📣 Allows organizers to highlight and reward active attendees
- 🔒 Ensures fair selection and easy verification with QR codes
Summary
- Set a Swag Requirement Threshold (>0) to enable the prize draw.
- Enable “Ask attendees for their names” in the conference settings.
- After the event, use the Prize draw button on the conference details page to select a winner.
- SpreaView displays the winner’s name and a QR code for on-site verification.
4 - Licenses
The right packages for the right conference
SpreaView offers flexible licensing options designed to fit events of all sizes and budgets. Whether you’re running a small community meetup or a large-scale professional conference, selecting the right license is essential to unlocking the features you need.
Understanding the differences between license types helps you:
- Ensure access to the appropriate features.
- Align functionality with your event’s scale and complexity.
- Budget effectively for your conference.
Available License Types
SpreaView provides three types of licenses, each tailored to a different type of event:
Ideal for non-commercial, grassroots events such as user group meetups or free conferences. This license offers essential functionality to collect feedback and support basic reporting needs.
Designed for medium-sized, paid, or professionally organized events. This license unlocks enhanced features such as external integrations, more advanced analytics, and greater customization options.
Built for large conferences and organizations that require the full SpreaView feature set, including enterprise-level capabilities, expanded customization, and dedicated support options.
Choosing the correct license ensures your event can make the most of SpreaView’s capabilities, from feedback collection to real-time reporting and post-event insights.
4.1 - Community License
Free license for community conferences
The Community License is a free option provided by SpreaView to support smaller, public, non-commercial events. It offers a streamlined version of the platform while still giving organizers access to powerful session feedback capabilities.
You may use the Community License if your conference meets all of the following criteria:
- ✅ Free for attendees (no registration fee or paid access)
- ❌ Not used for internal company events
- ❌ Not used for promotional, marketing, or lead generation purposes
- ❌ Not a commercial or profit-oriented event
This license is intended for community-driven events, such as:
- User group meetups
- Volunteer-run tech gatherings
- Free and open-to-the-public conferences
⚠️ Note: Using the Community License for private, commercial, or sponsored events violates the terms of use.
Feature Limitations
The Community License includes the core SpreaView functionality but with some feature restrictions:
| Feature | Availability |
|---|
| Number of Tracks | Limited to 5 |
| Themes | ❌ Not available |
| AI Content Recognition | ❌ Disabled |
| External Sync (e.g., Sessionize) | ✅ Available, but must be triggered manually |
| Session Feedback & Dashboards | ✅ Included |
| QR Code Support for Reviews | ✅ Included |
| Speaker Dashboards | ✅ Included |
These limitations ensure fair and sustainable use of the platform for community purposes.
Getting Started
When setting up a new conference, simply select the Community License during configuration. SpreaView will validate the license usage and apply the appropriate settings.
Summary
- The Community License is free for qualifying public, non-commercial events.
- It supports basic functionality including session feedback and speaker dashboards.
- Limited to 5 tracks and excludes theming and automated external sync.
- Strictly not for internal, private, promotional, or commercial use.
4.2 - Professional License
Paid license with limited options, ideal for small conferences
The Professional License is designed for commercial and professionally organized events that require more customization and capabilities than the free Community License offers. It includes features to enhance branding, improve content discoverability, and support more robust event operations.
Who Can Use the Professional License?
The Professional License is suited for conferences that meet any of the following:
- 💼 Professionally organized or managed events
- 💰 Paid or ticketed events
- 📢 Sponsored, promotional, or marketing events
- 🏢 Internal or corporate conferences
This license allows organizers to run events that are commercial in nature, while still maintaining a simplified setup suited for mid-sized events.
Included Features
The Professional License includes all features from the Community tier, with enhanced capabilities:
| Feature | Availability |
|---|
| Number of Tracks | Limited to 5 |
| Themes | ✅ Supported (custom foreground, background, logo) |
| AI Content Recognition | ✅ Enabled |
| External Sync (e.g., Sessionize) | ✅ Available, but must be triggered manually |
| Session Feedback & Dashboards | ✅ Included |
| QR Code Support for Reviews | ✅ Included |
| Speaker Dashboards | ✅ Included |
| Prize Draw Support | ✅ Included |
| Organization Collaboration | ✅ Included |
Branding Support with Themes
Unlike the Community License, the Professional License lets you apply custom themes to your conference. This allows you to:
- Align attendee-facing pages with your event’s brand
- Add your logo
- Customize colors for headers and title bars
Themes are reusable entities and can be shared across multiple conferences within your organization.
AI Content Recognition
With AI content recognition enabled, SpreaView can provide smarter session tagging and more relevant content discovery—helping you identify key trends and surface insights faster after the event.
Manual Synchronization
Synchronization with external sources (e.g., Sessionize) is supported, but must be triggered manually via the interface. This gives organizers control over when and how data is refreshed.
🔁 Full automation is available in the Premium License.
Summary
- Designed for commercial, sponsored, or internal conferences
- Supports custom themes and AI content recognition
- Limited to 5 tracks
- Synchronization with external systems must be manually triggered
4.3 - Premium License
Paid license fully featured, ideal for larger or recurring conferences
The Premium License is SpreaView’s most comprehensive option, tailored for large-scale, commercial, or enterprise-grade conferences. It unlocks the full capabilities of the platform, including automated data flows, advanced AI insights, and increased scalability.
Who Can Use the Premium License?
The Premium License is ideal for:
- 🎟 Large professional or commercial conferences
- 🏢 Enterprise or internal corporate events with many sessions
- 🧠 Organizers who want deep insights into content popularity and attendee behavior
- 🔄 Teams who need real-time data sync and worry-free session management
This license gives organizers the tools and flexibility required to run high-quality events at scale.
Included Features
The Premium License includes everything from the Community and Professional tiers, and significantly extends functionality:
| Feature | Availability |
|---|
| Number of Tracks | Up to 15 |
| Themes | ✅ Fully supported (custom colors and logo) |
| AI Content Recognition | ✅ Fully enabled |
| External Sync (e.g., Sessionize) | ✅ Automatic background synchronization |
| Session Feedback & Dashboards | ✅ Included |
| QR Code Support for Reviews | ✅ Included |
| Speaker Dashboards | ✅ Included |
| Prize Draw Support | ✅ Included |
| Organization Collaboration | ✅ Included |
AI-Driven Insights
With the Premium License, AI content analysis is fully enabled, allowing SpreaView to:
- Analyze session descriptions and topics
- Provide valuable feedback on the popularity and relevance of content
- Help organizers identify trending themes across the conference
- Support content planning for future events
This makes it easy to understand what resonates with your audience and improve the program year over year.
Automated Data Synchronization
Unlike the Community and Professional tiers, the Premium License supports automatic background synchronization with supported external sources (such as Sessionize). This means:
- 🕒 No manual syncing required
- ✅ Schedule changes are automatically reflected
- 🔄 Speaker and session updates flow into SpreaView in real time
Organizers can focus on running their event without worrying about stale or inconsistent session data.
Summary
- Ideal for large, professional, or enterprise conferences
- Supports up to 15 tracks
- Full access to custom theming and AI session analysis
- Automatic background sync with external sources
- Unlocks the full power of SpreaView’s feedback and insight features
5 - Themes
Adjusting the look and feel of public pages
The Themes feature in SpreaView allows you to customize the look and feel of public-facing pages, such as attendee review forms and speaker dashboards. With support for custom colors and a logo, themes help ensure a consistent, branded experience for your event.
What Are Themes?
In SpreaView, themes are standalone, reusable entities. Instead of configuring styling directly on a conference, you define a theme once and then assign it to one or more conferences. This makes it easy to:
- Maintain visual consistency across multiple conferences.
- Re-use the same branding for annual or regional events.
- Make global changes to the look and feel by updating a single theme.
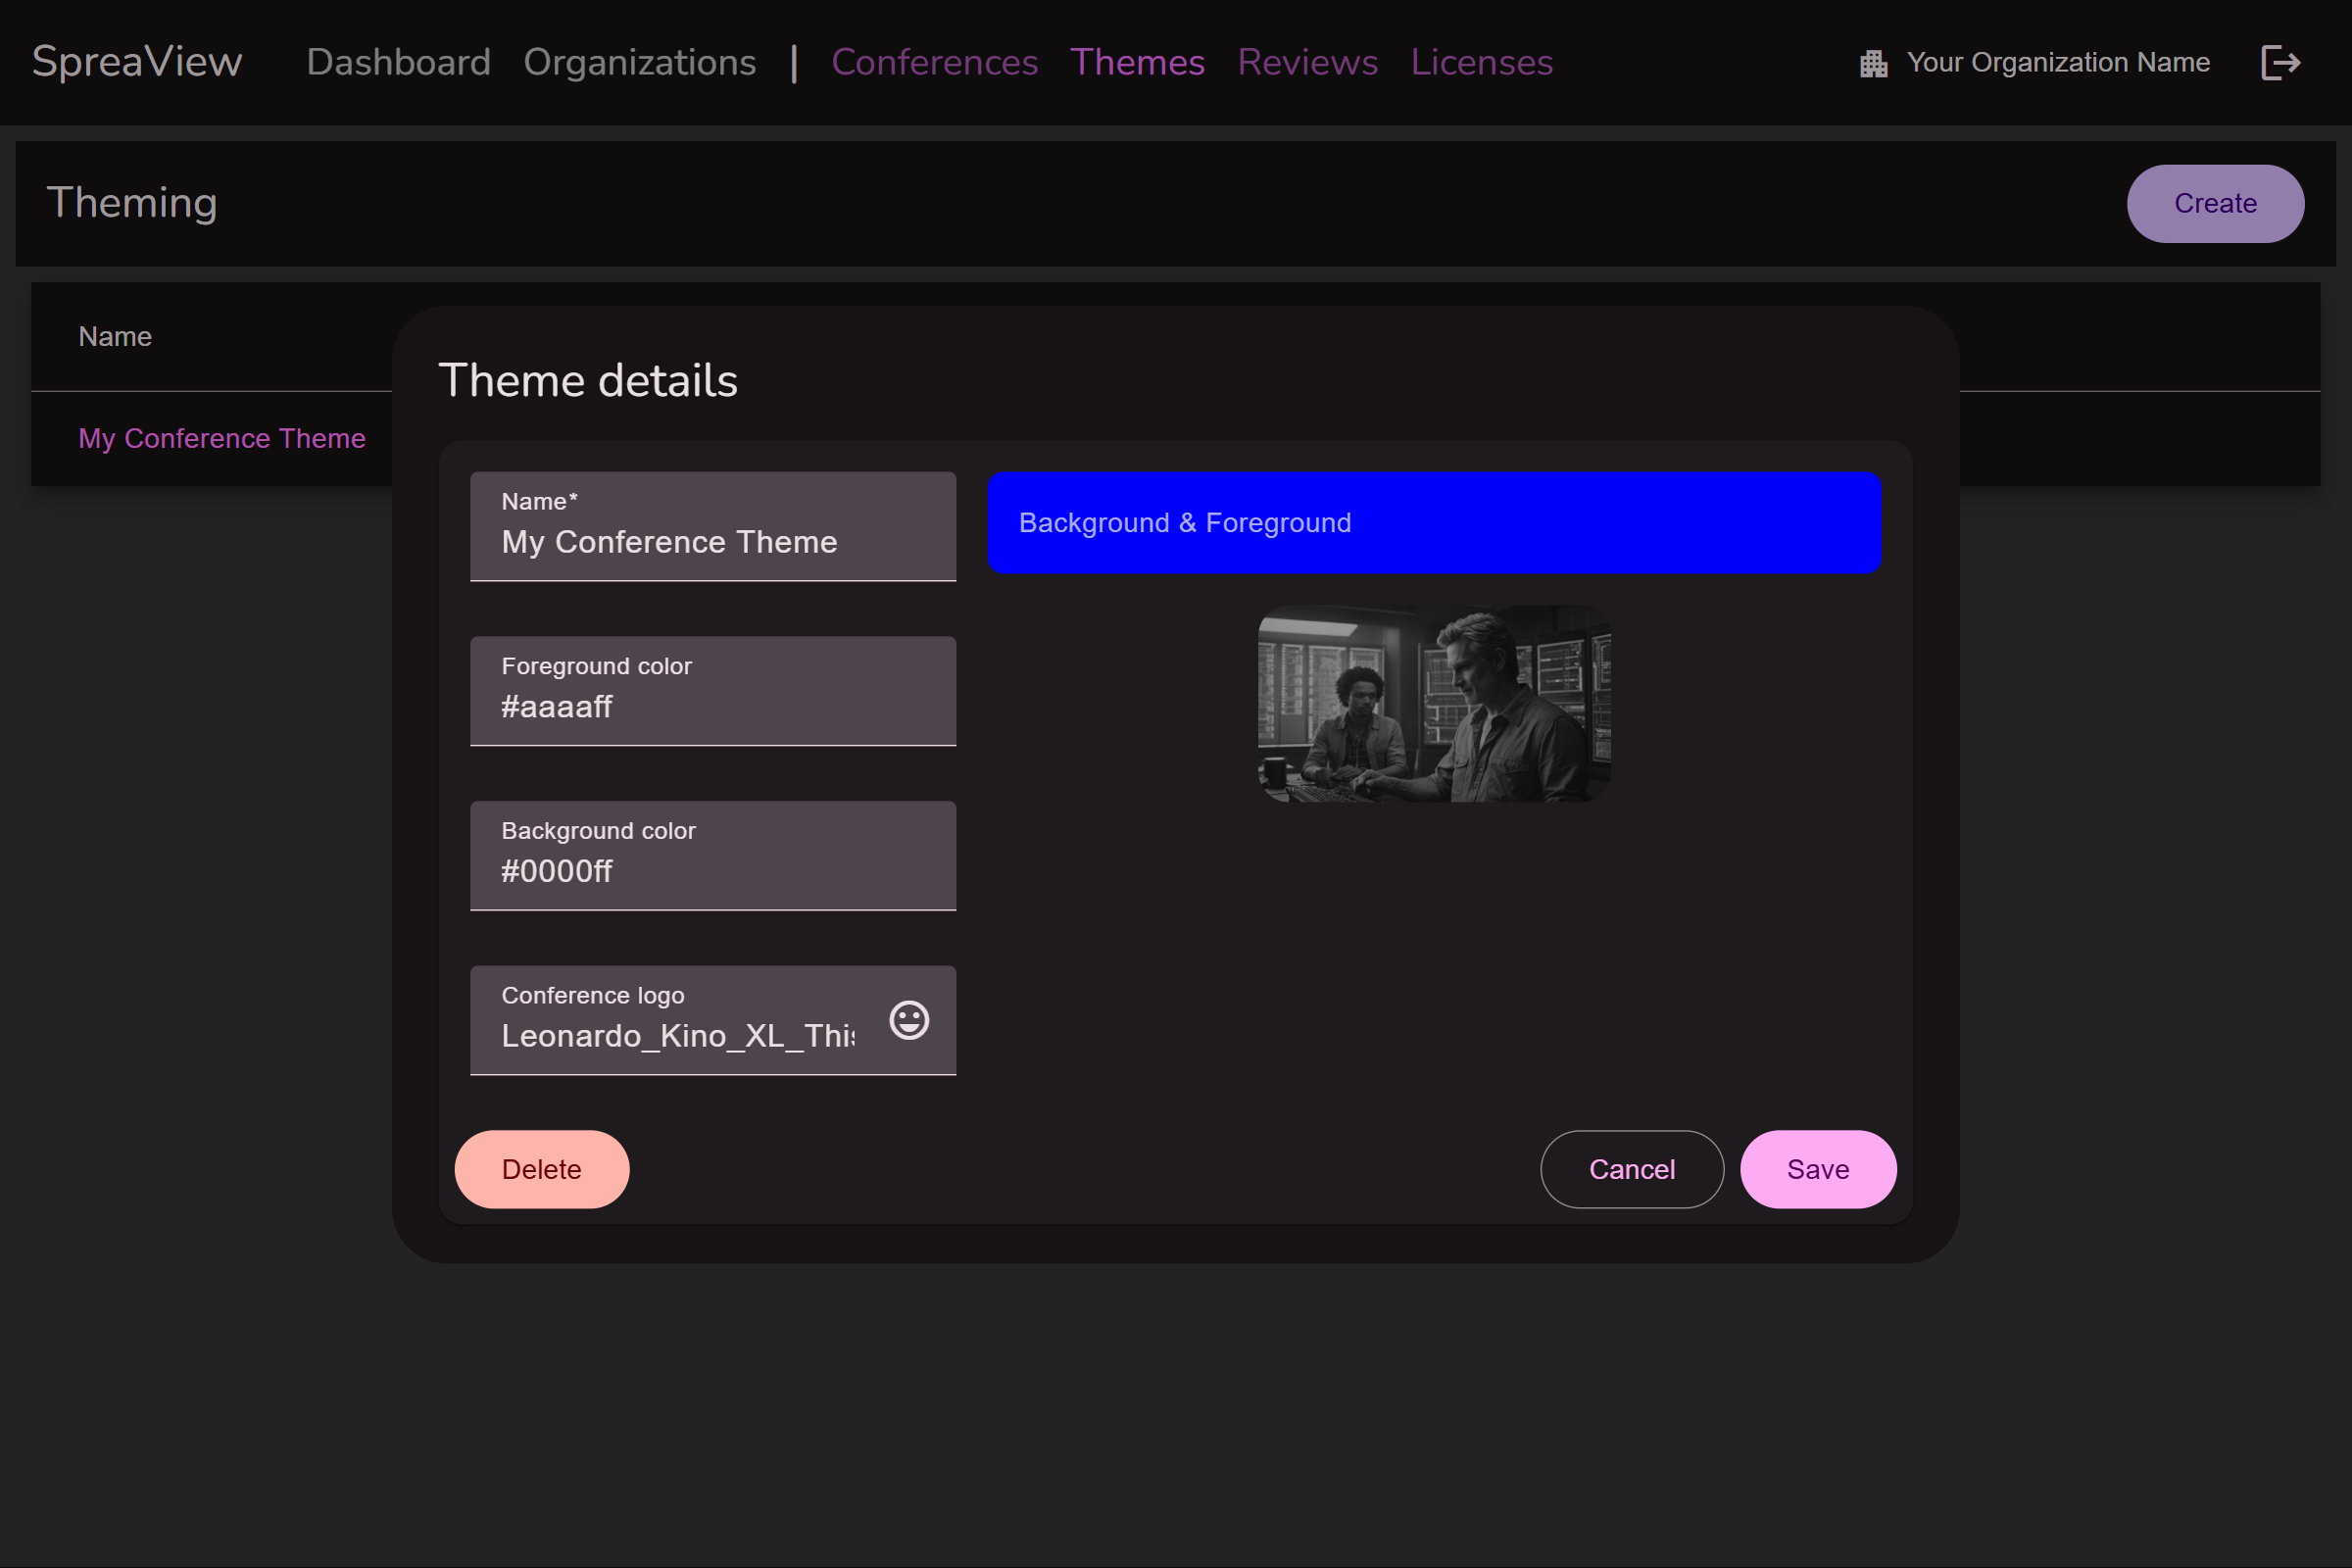
Theme Customization Options
A SpreaView theme includes the following elements:
1. Foreground Color
Used for UI accents such as title bars and text highlights. Choose a color that stands out clearly against the background.
2. Background Color
Sets the backdrop for headers and other styled components. Use a color that matches your event branding.
3. Logo
Upload your event or organization’s logo. This will be displayed on attendee and speaker-facing pages—either at the top or bottom of the screen, depending on the layout.
✅ For best results, use a transparent PNG logo with high resolution.
Assigning Themes to Conferences
Once a theme is created, it becomes available to all conferences you manage. To apply a theme to a specific conference:
- Go to the Conference Details page.
- Locate the Theme dropdown or selector.
- Choose the theme you want to apply.
- Save your changes.
The selected theme will now be applied to all relevant pages associated with that conference.
🔁 You can change the assigned theme at any time.
Where Themes Are Applied
Themes affect the visual styling of:
- Session review forms accessed via QR codes
- Speaker dashboards
- Public conference pages, if enabled
All these pages reflect the theme’s colors and display the configured logo, ensuring a professional, branded experience.
Summary
- Themes are separate entities in SpreaView and can be re-used across conferences.
- Each theme includes a foreground color, background color, and a logo.
- Themes are assigned to a conference via the Conference Details page.
- Theming applies to all attendee and speaker-facing pages.
6 - Speakers
Speakers can find their personal information on the speaker dashboard
SpreaView puts great value on supporting speakers in their professional development by providing clear, structured, and actionable feedback on their sessions. The Speakers section of the documentation explains how speakers can use SpreaView to access their sessions, retrieve review QR codes, view audience feedback, and manage their preferences.
What You’ll Find in This Section
This part of the documentation covers:
- 📢 Notifying speakers: Learn how you can notify speakers to access their dashboard
- 📋 The Speaker Dashboard: Learn what information is available to speakers, how to navigate it, and how to make use of the built-in feedback tools.
- 🧾 Registering as a Speaker: How new speakers can join SpreaView and access their sessions across multiple conferences.
- 🚫 Opting Out: How speakers can choose to opt out of the platform if they prefer not to receive session feedback or be listed in the system.
Speaker Dashboard Overview
Once logged in, speakers are presented with their personalized Speaker Dashboard. This dashboard is designed to help speakers track their past and upcoming sessions and engage with the feedback they receive:
Left Panel – Upcoming Sessions
Right Panel – Delivered Sessions
Whether you’re preparing to speak or reflecting on a recent presentation, SpreaView’s tools are here to help you grow. Let’s get started!
Next: Using the Speaker Dashboard
Would you like this section split into individual pages for dashboard use, registration, and opt-out steps?
6.1 - Invitations
Learn how you can invite your speakers to spreaview
Inviting Speakers to SpreaView
Once your conference is set up in SpreaView, it’s important to inform your speakers that they can access their speaker dashboard to download QR codes and view feedback on their presentations. Because SpreaView is designed with privacy in mind, it does not store personal contact information about speakers (such as email addresses). This ensures data protection but also means that direct communication with speakers must be handled outside of SpreaView.
How to Invite Speakers
You can invite your speakers by sending them their personal speaker dashboard link, which you can find in the Speakers Overview section of your conference.
Steps:
- Go to your Conference.
- Navigate to the Speakers overview.
- Locate the speaker you want to invite.
- Copy the Speaker Dashboard URL from their entry in the list.
- Send this link to the speaker via your preferred communication channel.
Accessing Speaker Dashboards
There are two ways a speaker can access their dashboard in SpreaView:
1. Internal SpreaView ID
Each speaker has a unique SpreaView ID, which generates a direct dashboard URL. This is available in the speakers overview of your conference.
2. External ID (Sessionize)
If your conference was imported from Sessionize, each speaker also has an external Sessionize ID, which SpreaView uses to link sessions and feedback.
Reaching Speakers Imported from Sessionize
For conferences using Sessionize integration, SpreaView supports identifying speakers by their Sessionize ID. However, SpreaView still does not store or access the speaker’s email addresses directly.
This means that if you want to notify speakers:
- You must send the message from within Sessionize, using its communication features.
- SpreaView helps by offering a message template you can use.
Where to Find the Message Template
- Enter your Sessionize API ID on the conference details page.
- SpreaView will display a sample message you can copy and use in Sessionize to email your speakers.
This message includes the correct personalized dashboard URLs, allowing each speaker to access their feedback securely and privately.
Summary
- SpreaView does not handle speaker email communication directly due to privacy design.
- Use the Speakers Overview to get individual dashboard URLs.
- For speakers from Sessionize, send messages through Sessionize using SpreaView’s template.
- Make sure each speaker receives their personalized link so they can access feedback and QR codes.
6.2 - Registration
What can speakers do when they follow the link to their dashboard?
When a speaker follows a personal SpreaView dashboard link—either from an organizer or via an external system like Sessionize—the platform ensures a clear and privacy-respecting experience. Based on whether the speaker is already a registered user, SpreaView will respond in one of two ways.
Option 1: The Speaker Is Not Yet Registered
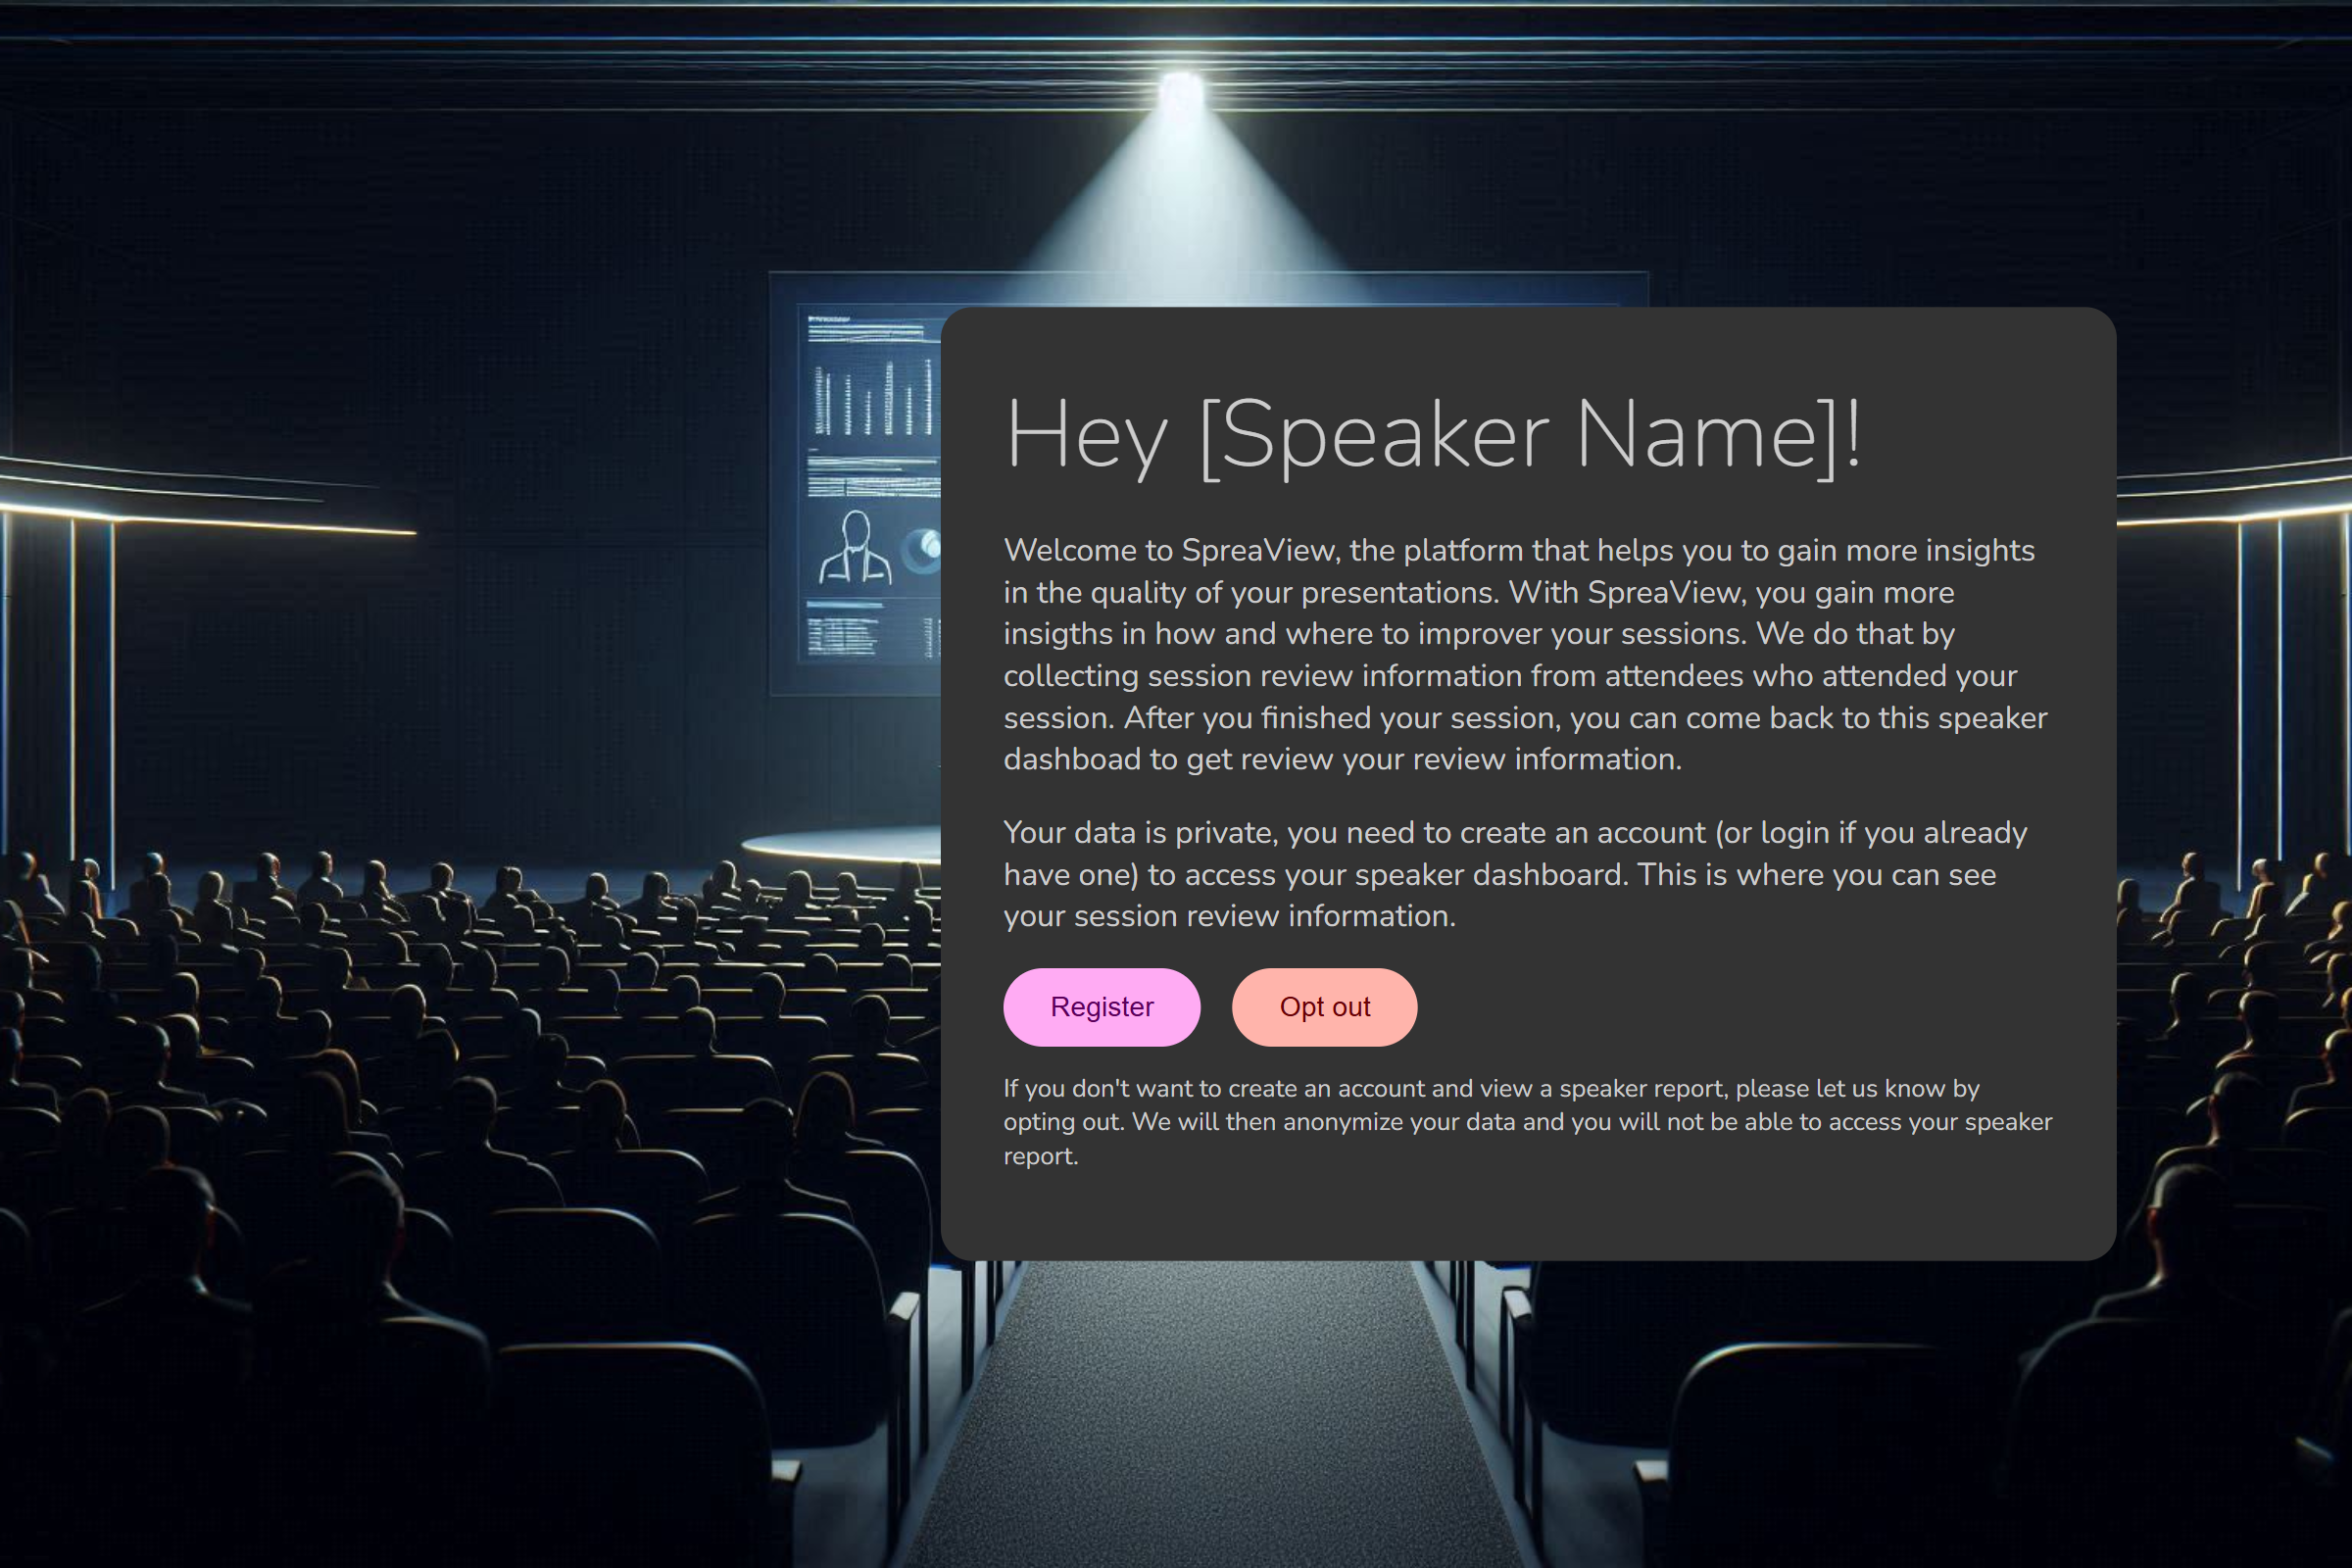
If the speaker is visiting SpreaView for the first time, they will see a welcome screen with two options:
Register
- Clicking the Register button will redirect the speaker to the login and registration page.
- Here, the speaker can create a new SpreaView account using an email address and password.
- After registering and logging in, the speaker is automatically redirected to their personal dashboard.
Opt Out
If a speaker prefers not to use SpreaView, they can choose to opt out.
This action will:
- Anonymize the speaker’s dashboard and personal information
- Disable registration for that speaker’s dashboard link
- Hide all feedback and performance data from future access
Organizers will no longer be able to associate feedback data with this speaker.
This provides a strong privacy-first approach, giving speakers full control over their presence on the platform.
Option 2: The Speaker Is Already Registered
If the speaker is already a registered SpreaView user and accesses their personal dashboard link:
- SpreaView will recognize the speaker and greet them with a Welcome back message.
- Only a Login button is shown.
- Once the speaker logs in, they will be redirected directly to their personal speaker dashboard.
This ensures a seamless experience for returning users, connecting them instantly with their session feedback and tools.
Summary
| Situation | Action Available | Result |
|---|
| Not registered | Register | Redirects to account creation and then to speaker dashboard |
| Not registered | Opt Out | Anonymizes the speaker and disables dashboard access |
| Already registered | Login | Redirects to the speaker dashboard |
This flow balances usability and privacy, ensuring speakers can make informed choices about participation and feedback access.
6.3 - Dashboard
What speakers see when they identified themselves
Once a speaker logs in to SpreaView, they are presented with their personal speaker dashboard. This dashboard is designed to give speakers clear visibility into both their upcoming sessions and the feedback from sessions they have already delivered.
Registered speakers can always access their personal dashboard by navigating to https://spreaview.com/speakers and log in from there.
Layout of the Dashboard
The speaker dashboard is divided into two main sections:
Left Side – Upcoming Presentations
This section displays all presentations that are scheduled in the future across any conference the speaker is participating in. For each upcoming presentation, the tile shows:
- Title of the session
- Scheduled start time and date
- Conference name
- Download button for the QR code
The QR code is unique to each session and can be printed or shown during the session to allow attendees to easily access the review form. This helps speakers gather more feedback by making it convenient for the audience to leave reviews immediately after a session.
Right Side – Delivered Presentations
This section lists all presentations that have already been delivered. Each tile in this section contains:
Title and time of the session
Conference name
Average review scores (if feedback was received)
A link to the full session report
Clicking this link takes the speaker to a detailed overview of the feedback, including:
- Individual rating scores
- Reviewer comments (if allowed)
- Summary statistics
This real-time access to review data provides speakers with valuable insights into how their sessions were received, helping them improve their delivery and content for future events.
Summary
| Section | Description |
|---|
| Left Side | Shows future presentations, with QR code download links |
| Right Side | Shows past presentations, includes feedback summaries and links to full reports |
The SpreaView speaker dashboard empowers speakers with direct access to feedback, all in one place—across multiple conferences.
6.4 - Reports
What can be found on a speaker report
The Speaker Report in SpreaView provides presenters with detailed insights into how their sessions were received by attendees. It includes both individual session feedback and conference-level metrics, helping speakers better understand their performance and impact.
📊 Session Review Categories
Each session is evaluated by attendees based on four core categories:
- Speaker – The speaker’s clarity, engagement, and presence
- Content – The relevance, depth, and usefulness of the session content
- Delivery – The quality of the presentation and use of materials
- Interaction – How well the speaker interacted with the audience
📝 Optional Free Comments
Conference organizers can choose to enable a free comments section in the review form. If enabled, attendees can leave open feedback in addition to numeric ratings.
📈 Feedback Summary
Each Speaker Report displays:
- Scores and averages per review category
- An overall average score
- A list of all received comments (if enabled)
Comments are presented in an expandable list so speakers can read them one at a time. If a speaker comes across an inappropriate or abusive comment, they should report it directly to the conference organizers.
Conference Metrics
In addition to session-specific scores, SpreaView provides conference-level insights, including:
- Total number of speakers and number of sessions
- Average review scores for the entire conference
- Total number of reviews submitted by attendees
- Your session’s position in the speaker ranking (based on the “Speaker” score)
🔒 Note:
Some of these features—such as rankings and conference-wide statistics—are only visible if the conference license supports them and the organizer has chosen to enable them.
Conference Top 10
At the bottom of the Speaker Report page, speakers will find a Top 10 list of the highest-rated sessions in the conference. This ranking is based on the Average score only and is limited to the top 10 presentations. This gives speakers a sense of where they stand among peers while keeping the focus on positive performance.
Privacy and Fairness
SpreaView ensures that all data shown in the speaker report is collected transparently and used to help speakers improve. Rankings and comments are intended as constructive tools, and any abuse should be reported.
7 - Integrations
Making life a lot easier
To make life a little bit easier, You can integrate SpreaView with other systems. At this time, only Sessionize is supported as external system.
In this chapter, we will show you how to integrate with Sessionize, and how to automatically import speakers and session data from Sessionize.
7.1 - Sessionize (Technical)
How the Sessionize import works under the hood
SpreaView integrates with Sessionize to streamline the process of importing event data, such as speakers, rooms, and sessions. This technical documentation explains how to set up the integration, configure your Sessionize account, and ensure that all necessary data is successfully imported into SpreaView.
Prerequisites
Before starting the import process, make sure you have:
- A Sessionize API ID (you’ll need to create this in Sessionize).
- Your event’s schedule in Sessionize Schedule Builder fully created and set to Published. If the schedule is not published, Sessionize will not expose the data through the API, and the import will fail.
Ensure Your Schedule is Built in Sessionize
To successfully import data from Sessionize, you need to ensure that your event schedule is fully built and configured in the Sessionize Schedule Builder.
Using the Sessionize Schedule Builder:
- Access Schedule Builder: In your Sessionize event, go to the Schedule Builder tool.
- Assign Sessions to Rooms: Make sure that all sessions are assigned to specific rooms and have clear start and end times. This is essential, as the rooms and sessions will be imported based on this information.
- Speakers Linked to Sessions: Ensure that each session has its speakers properly assigned, as this data will also be imported into SpreaView.
Publish the Schedule in Sessionize
The most critical step before importing data into SpreaView is ensuring that the schedule in Sessionize is Announced. If the schedule remains in draft form, Sessionize will not expose the session, room, or speaker data through its API, and as a result, the import will fail.
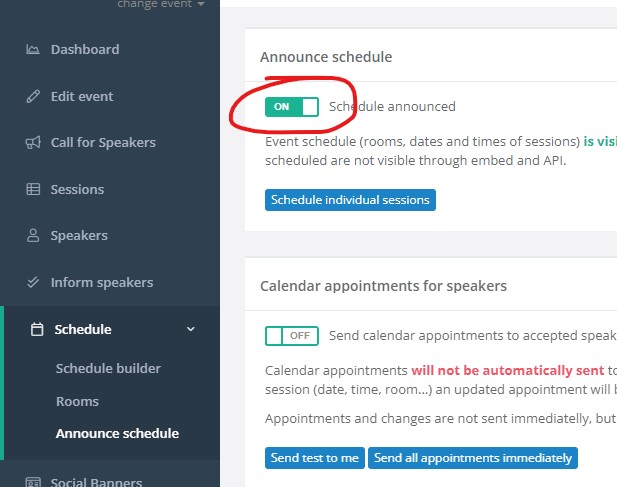
Importing Data into SpreaView
Once your event is set up, one of the event properties is to enter the Sessionize API ID. When you enter the Sessionize API ID (only the ID, not the entire URL), a button Sync Sessionize is enabled. SpreaView will import all data from sessionize when every time you click that button.
Steps to Import Data:
- Log in to SpreaView: Navigate to the SpreaView platform and log in with your account.
- Navigate to the Event Settings: Select the event where you want to import data.
- Start the Import: Once the API ID is entered, click Sync Sessionize. SpreaView will connect to Sessionize and retrieve all relevant event data, including:
- Speakers: All speakers associated with the sessions.
- Rooms: All rooms assigned to sessions in the schedule.
- Sessions: All sessions, including their schedule, room assignments, and associated speakers.
Verifying Imported Data
After the import process is completed, it’s important to verify that all data has been imported correctly.
What to Check:
- Speakers: Ensure that all speakers from the Sessionize event have been successfully imported and linked to their respective sessions in SpreaView.
- Rooms: Verify that all rooms created in the Sessionize Schedule Builder have been imported and are properly associated with the correct sessions.
- Sessions: Check the sessions to confirm that they have the correct start and end times, room assignments, and speaker information.
Troubleshooting Common Issues
If you encounter any issues during the import process, here are some common problems and solutions:
- Unpublished Schedule: If no sessions are imported, ensure that the schedule in Sessionize is Published. Unpublished schedules will not be exposed via the API.
- Incorrect API ID: Double-check that the Sessionize API ID you entered is correct. If the API ID is incorrect, SpreaView will not be able to retrieve your data.
- Missing Data: If some sessions or rooms are missing, verify that all sessions in the Sessionize Schedule Builder are fully assigned to rooms and have scheduled times.
- Incorrect Dates: Note that the SpreaView will only import sessions from your schedule, that are planned within the timespan of your event. This allows you to create more SpreaView events for a single Sessionize event, for example when you’re organizing a MeetUp with multiple event dates. You can now easily filter all sessions that are not planned for a specific MeetUp occasion by setting the proper MeetUp start- and end date.
Conclusion
Integrating Sessionize with SpreaView makes it easier to manage event data by importing speakers, rooms, and session information automatically. By ensuring your Sessionize event schedule is properly built, published, and using the correct API ID, you can streamline the process of setting up events in SpreaView. This integration helps reduce manual data entry and ensures consistency between platforms.